
Materials You will need:
15 baby food jars, cleaned, with lids
White glue
Christmas ribbon and decoration (optional)
Small Christmas lights
Hammer
Large pliers
Tin foil, cardboard backing, gold/silver paint (optional)
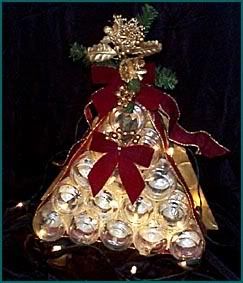
1. The first part of this project - gluing the jars together to form the tree shape - took the longest. (I opted to use white glue instead of hot glue or just "rubber-banding" them together.) I allowed each row to dry before adding the next row, laying 5 jars down on their sides and bracing them together with blocks of wood on each end. When the glue was dry, I added the next row of 4 jars, then the next row of 3 and so on.
2. Using the hammer and screwdriver, pound a hole in the center of each lid. (I used a block of wood, placed the screwdriver in the center, and gave it a good whack, then wiggled the screwdriver back and forth to enlarge the hole.) Protect your fingers and the lights from sharp edges by wrapping the hole with tin foil or electrical tape. I used tin foil and left large pieces hanging out into the center of the lid, because I liked the shiny effect.
3. Insert lights through the lids and screw the lids onto the jars.
4. Decorate with ribbon and Christmas doodads as you like. My Christmas colors this year will be burgundy, gold and white, so I used burgundy ribbon and bows, and some gold decorations.
5. If your centerpiece will sit against a wall, that's all you need to do. However, I want to place my centerpiece in the window sill, and the back will be visible. So, I cut out a piece of cardboard to match the size of my jar-tree and painted it metallic gold. I attached the cardboard using a piece of ribbon, tying a bow at the back. If I get really ambitious, I may make another one of these and stand them back to back in the middle of the table!
No comments:
Post a Comment