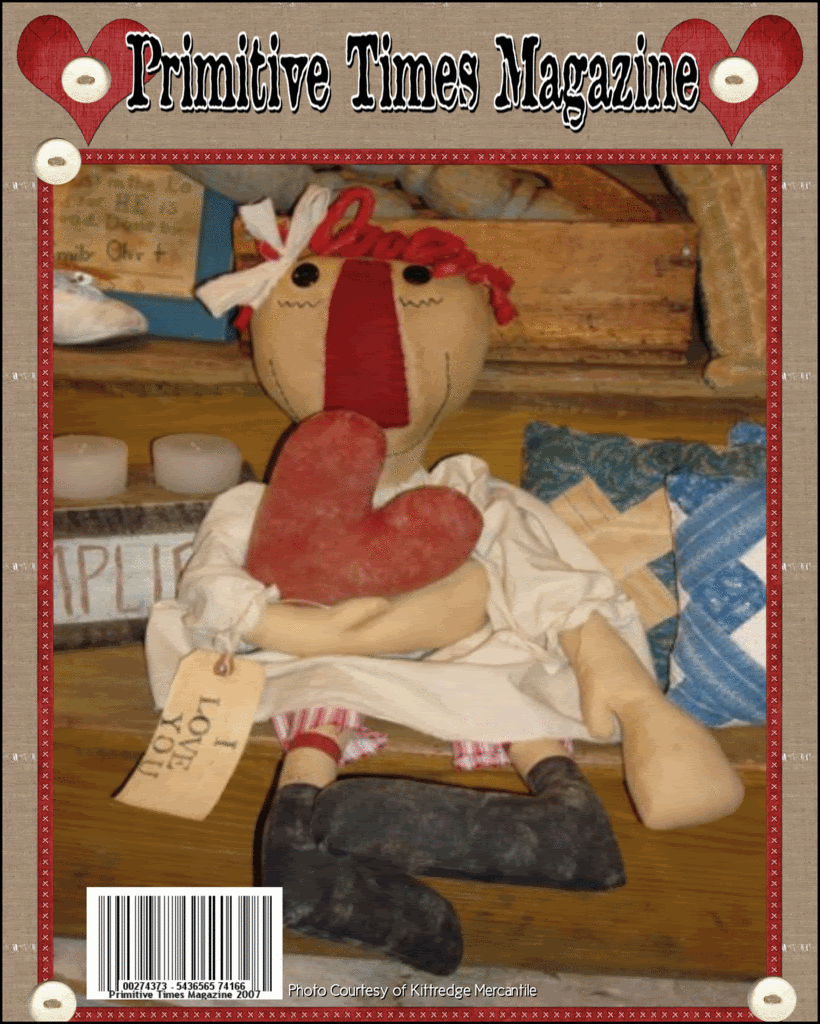
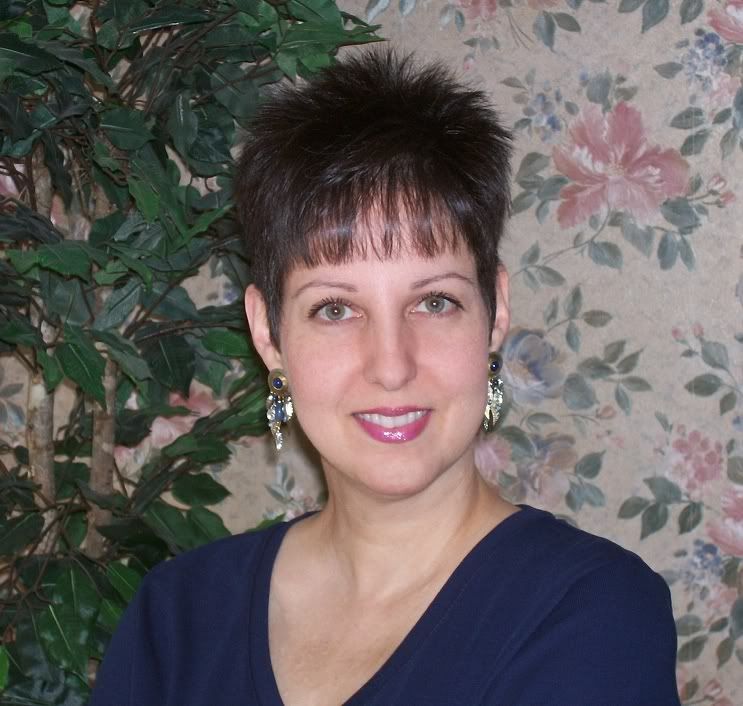
Saturday, August 30, 2008

Prim Friends Network


Looking to promote your craft business website or blog for free?
Whether you craft primitive, whimsy, vintage or shabby chic... Prim Friends Network is the place to visit & network from.
Each week a crafter will be featured and there will be a drawing for a give-a-way.
If you are interested in 'networking', send Shari, the owner of Prim Friends Network your 125x125 button banner. In return you need to set up a Prim Friends Network link on your site. This can be text only, or you can be as elaborate as you would like with pictures, banners, etc. The only requirement is that you do it! This is a Network and it doesn't work if it's members don't "Network"!
Let's work together to promote crafting AND your business! Visit Prim Friends Network today!

Friday, August 29, 2008

Zoho Writer: FREE Program For PDF Files

A few pattern makers on a Prim Forum I belong to asked how they could turn their paper patterns into PDF files for Epatterns. I mentioned that I do mine on a FREE program called Zoho Writer. They checked out the link but were a little overwhelmed by the program. While I don't pretend to know everything about it, I have used it a number of times for my own e-patterns and wrote up some instructions on how I use it. If you are interested in reading them you are welcome to download the pdf : Creating E-Pattern PDF Files On Zoho

Thursday, August 21, 2008

Grubby Electric Candles

These grubby candles are fun to make! This is one of the first ones I made a few years back.
I picked up some old electric candles at yard sales and flea markets . Sometimes you can find them at dollar stores too.

I took some sandpaper and sanded down the candle, then painted it with brown acrylic paint. When it dried, I painted it with Mod Podge and then rolled it into a mixture of instant coffee, real coffee grounds, ground cinnamon, nutmeg and cloves.

When that was dried, I would paint on some more Mod Podge sporatically and 'drizzle' more cinnamon over that.
Once dried, I painted with another coat of Mod Podge to seal the coffee mixture.
I purchased a fluted candle pan and glued the candle to that with clear Liquid nails. I tried hot glue and didn't like the results. Didn't hold good enough.
I tied a strip of homespun around the base of the candle and attched some red pip berries. Then filled the candle pan with scented rosehips.
I replaced the bulb that came with the candle with a silicone coated bulb.

Sunday, July 06, 2008

Featured Crafter

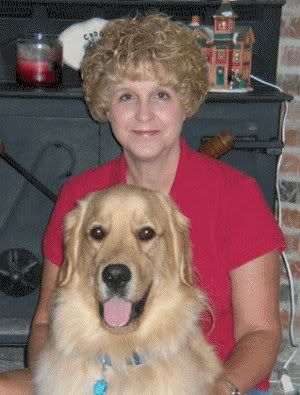
Susan Dean-Threadbare Primitives

By Denise Bailey

Please tell us a little bit about yourself 

 I am 49 years old and have been married for 28 years. No kids but lots of "fur babies". I have three "indoor" cats....Jinx, Chadwic, and Porter and one tiny four pound Chihuahua named Baxter. These are my kids and I spoil them rotten every waking moment. I guess you could say I am an animal lover. My husband and I also run a cat rescue center on our property for unwanted or abused cats.


 I live in a  
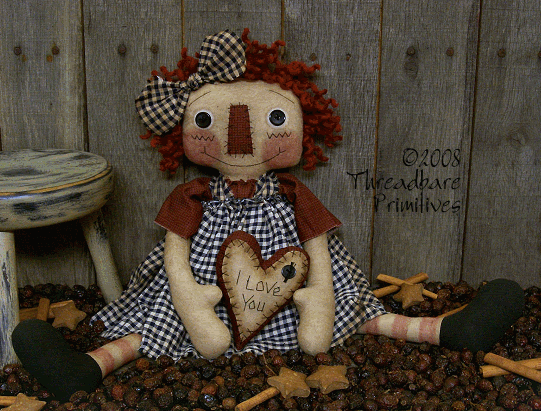
beautiful old 85 year old farmhouse on 2 acres surrounded by trees, squirrels, and every kind of critter. I love to cook, read, go to auctions, and take care of my animals.


How long have you had your online shoppe?
I have been online with my website for about 4 years now. It has gone through many changes in those years and I am constantly updating it to keep it new and interesting. The latest thing I have added is my $4.99 epattern section. With the economy being a little tight I figured anyone can afford $4.99 for a pattern and not have to worry about spending the money.


How did you come up with the name Threadbare Primitives?
Well, when I started this business I did alot of extreme prim...which I love. I would sand those dolls till the stuffing showed....thus the name "Threadbare Primitives". Now I design everything from whimsical to extreme prim. I seem to go through phases.


How long have you been creating primitive and folkart patterns?
I have been sewing and crafting for 20 years but have only been creating patterns
for about 4 years. But I do enjoy stitching, punch needle, painting and working with clay. You name it and I have done it.


Is all your work done freehand or do you use a graphics program to draw out your patterns?
All of my patterns are drawn out freehand on a artists sketch pad. Then revised til they look the way I want. I don't think my dolls would have the same fe
el if I used a graphics program......I like the hands on approach.


How long have you been interested in drawing?  Did you take art classes?  Are you self taught?
I am a self taught artist. I design and draw every day. I try to do things that I am not entirely 
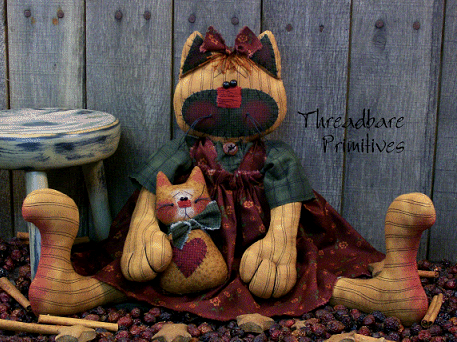
comfortable with in order to keep my edge and skill level up

What or who is your inspiration for the many wonderful patterns you create?
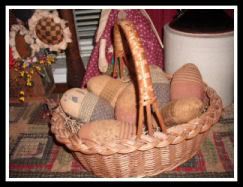
I love antiques and primitives, so anything old, rusty and with paint missing is right up my alley. I have always tried to make dolls and folk art that would fit into that decorating scheme. My whimsical dolls are just my attempt to be "just so darn cute". I guess I have a duel personality....I really try to design for all tastes.


How long would you say it takes you to create a new pattern, from beginning to end?
I have always been lucky. I just get an idea, draw it out, make the pattern and sew it up. I turn out 1-2 patterns every week which I think is good for my customers because they can visit my site and always see something new. It keeps them interested and inspired and always coming
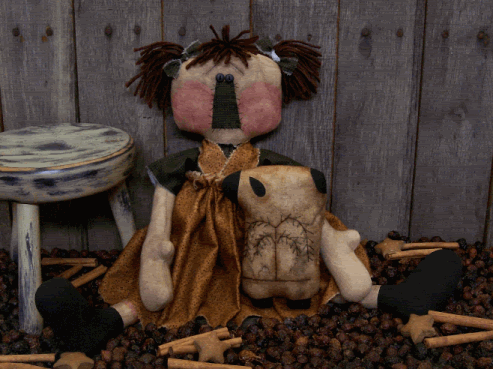
 back for more. 

Do you make one pattern at a time or several before you introduce them into your shoppe?
No...I make a pattern and get it up on the site on the weekend. I try to stay consistent with

with that....if I miss a weekend I get email saying "Are you gonna have something new this week?" LOL....I LOVE my customers! They TOTALLY keep me on my toes....I really love every one of them!


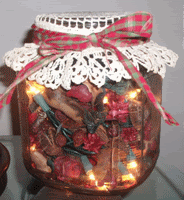
I see you are now offering punch needle, applique & sampler patterns, is this new or have you had them all along?
I have had those patterns for a while now...I love making samplers and patterns a 
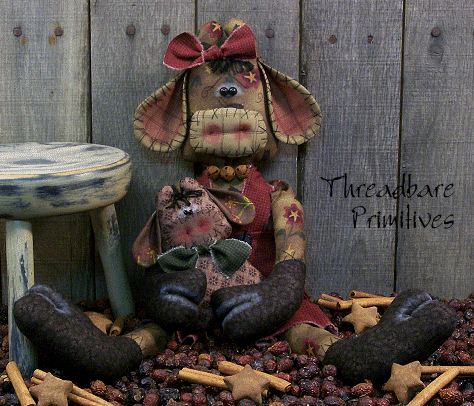
nd need to do more of them but I have been so busy with getting Fall and Halloween patterns in the works I have not had a chance. I will be doing more stitcheries though....the ones I have right now have been quite popular. They are very easy and can be finished in one evening.


What other venues besides your online shoppe do you offer your patterns for sale?  Which venue does best for your sales?
I currently sell through my own website, Ebay, and Prim Mart. I have also been honored to be on the front cover of "Homespun" magazine and have a pattern available within the pages and a lovely article written about my business
.


Do you sell your patterns wholesale?

 Yes, my patterns are available at wholesale pricing.
Threadbare Primitives Patterns are distributed and sold
throughout the USA as well as Australia, Italy and Canada
and through many finer Quilting and Needlework shops.


When you make an item to sell ( not the pattern) , do you make only one or do you make several?  For example: you make one item to use as the cover model for your patterns - sell that and you go on to the next pattern?
I have never made two of anything. The original creation serves as the model for the cover shot of the pattern jacket. That same model is then sold and I am on to the next idea.

Which type of pattern seems to be your best seller/s?
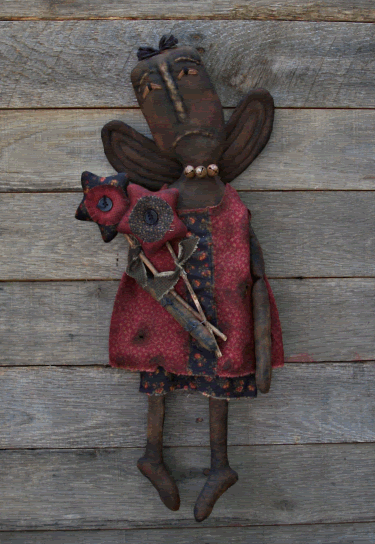
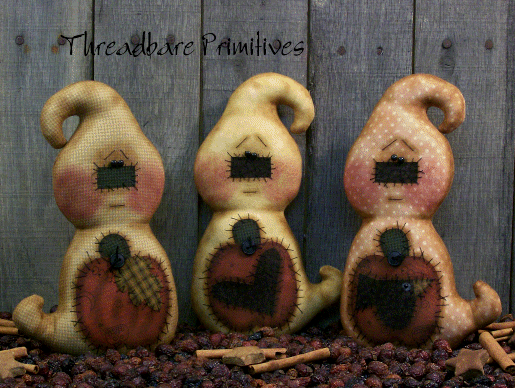
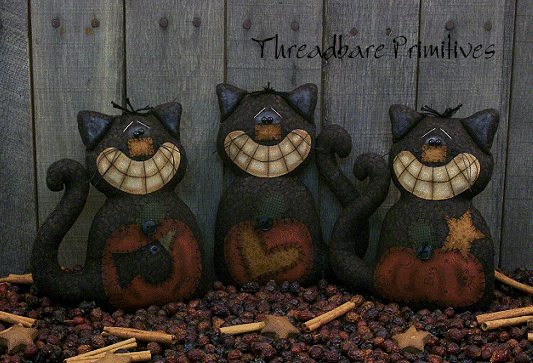
Right now I am selling alot of whimsical patterns...but then I have been focusing on that style for the last little while. I have about 175 patterns at the moment and I would say they break down half 'n half. Half are cute and whimsical and half are extreme prim. But...I have switched and have gone back to the prim style and have turned out some awesome black doll patterns with more coming.


Which type of pattern do 'you' have the most fun creating?
I love the extreme prim style though I am probably best known for my whimsical style. I love making and designing old black dolls and have released quite a few new black doll patterns over the past couple of months. I have alot more in the works too, so I will be concentrating on a more primitive style for a while.

Do you ever make something from your patterns to keep fo
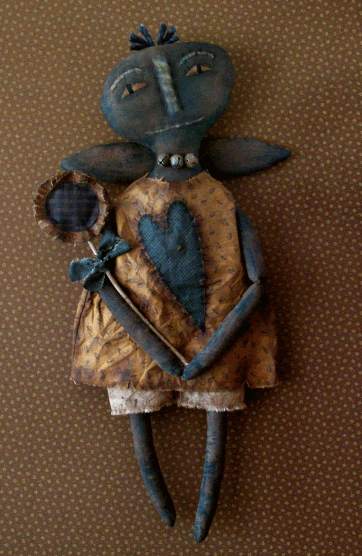
 r yourself?
Unfortunately, no....everything I make, I sell. (Sigh)

Alot of gals out there often ask me what is the key to success in this business. Since my strength is in business and I come from a business background I could go on and on about the business end of things. But one thing I always stress is that if you want to make a living with your art form, then treat it like a job. In order to make a living "out there" in the private sector you are required to go to bed at a decent hour, set your alarm clock, wake up get dressed and go to work. You will work for 8 hours every day to earn your pay check. You will do that consistently every day for 5 days a week. If you do that with your craft, if you REALLY treat it like a job, you will be successful. So my advice to anyone either starting out or who just isn't having the success they desire is to treat this business as a business. AND NEVER EVER EVER give up!!!!!


www.threadbareprimitives.com


July 2008 Issue


In this great issue we have 3 NEW E-Patterns, TONS Of Recipes
some with YUMMY photos, we have photos of Laurie's Fair Time Edition,
Scrapbook Layout Pattern, We also have great BUSINESS articles on the NEW Wave
of blogging called Entrecard, plus Business Tips with Denise and more! This is
our largest issue yet with OVER 71 PAGES!!!!!!! 


Click
here
to download our PDF format Version OR


Click here to view our Magazine ONLINE


Remember we are accepting ads for our August
issue which are currently HALF OFF for the next three days! So get your ad
NOW 

Tuesday, July 01, 2008

web hosting, wahm web hosting, wahm diy sitebuilder, diy webhosting

Prim Web DesignsPrim Web Designs they just launched a great new DIY(do it yourself) Sitebuilder with built in shopping cart! This is great for WAHM's and Crafters who like a template based site with little to NO HTML knowledge! Or you can customize the templates to suite your needs! You OWN the Sitebuilder once installed so you never have to worry about your site if you move to a new host you take the program with you!!

To see a working sample of the Adminstration panel CLICK HERE
or click to view more information on this great DIY Sitebuilder and affordable Web Hosting from Prim Web Designs

Tuesday, June 24, 2008

How to add an Etsy Mini To your Blog or Myspace


Do you want to help promote your etsy account well a wonderful way to do this is with an Etsy Mini! A Etsy mini is simply a small showcasing of some of your products that you can add to your blog or site itself. Just follow this easy to follow instructions to add your Etsy Mini To your Site today!

1. Log into your Etsy account
2. In the left hand column you will see "Etsy Mini" click here
3. Now you need to choose whether you want to display items you are selling in your shop or items you love. After this you need to choose thumbnail photos or larger gallery views and how big you want your mini by choosing how many rows and columns.
4. After you have chose all of that you will see a box of coding they have created for you, highlight the code by taking your mouse and highlighting all the text and then right click and click on COPY
5. Now log into your site or blog or myspace and add your code and save and you are all done! You have now added a "Etsy Mini" to your site! Hope you get lots of sales!

Resizing your photos for Ebay and Etsy

Have you been looking for ways to crop your photos because they are too large to use for your website, ebay or etsy? And you are just not techincally inclined? Well I came across this great video that will you walk you through the easiest way to crop your photos! Enjoy
Angie

Make your own stamps and prints!


I love coming across cool new tutorial to help my fellow crafters! I came across a great site tonight called Etsy Labs that has great crafting tutorials! Here is just one I wanted to share with you!
Get a block of linoleum from your local craft store and a couple carving tools to go with it! Draw the reverse of the design you want to produce and carve out the spaces you don't want reflected in the stamp:
Click here to finish this great tutorial

Sunday, June 15, 2008

30% OFF All Advertising in July Issue

Get your ad placed in our July Issue right now for 30 % off normal pricing!
Right now you can get

1/8 Ad for only $13
1/4 Ad for only $22
Half Page ad for only $32
Or Full page ad for only $42

Click here to advertise today

Thursday, June 12, 2008

Craft Ideas for Kids - Kids and Pasta

Craft Ideas for Kids – Kids and Pasta


Pasta is not just for tomato sauce. My kids loved pasta for many different art
projects. Next time you find a sale on pasta grab several varieties. Here are
just a few ideas of what kids can make with pasta.


Photo frames - We use either the bow tie pasta or the shell pasta. Start with
thick cardboard. I tend to use white so that we can add any color we want. Your
frame can either be circular or square. Cut out the frame, this is the actual
full size you’ll want at the end. Then cut out the middle to fit the size of the
photo you want to put in there.


Now decide if you want to spray paint the pasta or use food coloring. Gold
metallic spray paint looks great. We have also made various colors of pasta and
made rainbow frames.


If you want to turn your frame into a magnet, add some magnetic tape to the
back.


Necklaces and Bracelets – Penne pasta and macaroni noodles make wonderful
necklaces and bracelets. I suggest using fishing line. It just doesn’t break. As
with the frames, you can use multiple colors of pasta by adding food dye or you
can spray paint the pasta, allow it to dry and then string the pasta onto your
fishing line.


Decorative Jars - Save empty jars. Then fill the jar with an assortment of
shapes and colors of pasta. These jars make pretty decorations for bathrooms,
bedrooms or even end tables.


Pipe Cleaner Figurines - Grab a pipe cleaner. Now arrange pasta on the pipe
cleaner to create people and animals. Mix and match shapes and sizes and then
bend to create almost anything.


Self Portraits - Use spaghetti and linguini. Boil just until soft. Then press
the pasta onto construction paper and into a self portrait. You can also create
landscape scenes using the soft long noodles.


These are just a few ideas of how to use pasta to create great art projects made
by kids.


Article Source:
http://www.wahm-articles.com


Article Written By: Audrey Okaneko is mom to two
girls. She can be reached at audreyoka@cox.net or visited at

www.scrapping-made-simple.com

Thirteen Reasons Why Your Business Needs a Blog

A lot of online business woman
take for granted the benefits a blog has to their business, and a lot of them
choose not to use a blog because they simply can't see the benefit it has to
them and their business.


Well in this article you will learn thirteen very important reasons why your
business needs a blog!


1. Networking - Blogs are a great way to build relationships and networking with
those looking for your services and/or goods.


2. Information - Blogs are also a great way to get information out about the
products or services you sell!


3. Fun - Blogging is a great way to build your business while having fun. Really
it doesn’t even feel like work!


4. Affordable - Sometimes having a blog can be more affordable to get set up
than having a website. 1. Because the Wordpress Blogging platform is free to
install on your own hosting and domain, and 2. you don’t need expensive software
like Frontpage or Dreamweaver to maintain your blog.


5. Easy Maintenance - Using blogging platforms like Wordpress and the like make
it so much easier to add content to your website, through the art of categories
and the like, you can easily organize your content and make it easier for your
visitors to find what they are looking for and therefore encouraging them to
stay and visit for awhile!


6. Friends - While you are networking you can also make friends!


7. Interactive - With blogs you can be more interactive with your visitors by
making posts, asking for comments, and then replying to the comments, all
through your Wordpress admin dashboard! You can’t do that with a “regular”
website!


8. Easy RSS - It is super easy to create an RSS feed with a blog which means
more readers for your blogs!


9. Plug Ins - Plug ins add value to your blog by making it possible for you to
host podcasts on your blog, and even generate Google sitemaps too! With regular
websites you would either need to know alot about javascript, and a whole lot of
code mumbo jumbo, but with Plug Ins all you have to do is intall, configure, and
have fun! So much easier, and so much more fun!


10. More Search Engine Traffic - With the write Wordpress template and plug ins
- your traffic will be streaming in no time at all.


11. Flexibility - With Wordpress you have the flexibility to create posts,
pages, and you even have the control over what appears on your home page (like a
sticky post or even a specific page) which provides you with the flexibility to
either create more of a blogging type website, or a static type website.


12. Community/Partnerships - Wordpress blogs are a great way to create community
blogs! So say you have a team of employees, or business partners, Wordpress
makes the ability to have multiple authors of the blog seamless, which is a
great way for your team to grow their business!


13. Perfect - All around Wordpress is the perfect choice for you and your
business, by giving you the opportunity to communicate with your guests and to
help build strong relationships that will in turn help you grow your business.
No business should be without a blog, period!


Article Source:
http://www.wahm-articles.com


Article Written By:
Heather Bixler is the owner and Lead Designer at
Girly Blog Designz
.

Wednesday, June 11, 2008

My Baby is Growing Up!!!

OK don't laugh! But I had a OLD POOR ME DAY! LOL My daughter turned sixteen two weeks ago but thanks to dear old mom who lost her social security card we had to wait to get her drivers liscense until TODAY! Ok not only am I feeling OLD and everything but you know what today meant! It meant my baby is growing up! UGH

So needless to say I was the proper Mom no crying at the DMV while my daughter is taking her tests! OH No I would not want to embaress my teenager! Mom sat there with tissue hiding in her hand trying not to cry! I am not even joking I saw 7 kids in there getting their drivers licenses and all of us Moms had that look! The look of OH GOD MY Car Insurance rates just jumped through the roof! And OH GOD My baby is NOT a baby anymore! lol lol

The lady next to me her son was in my daughters drivers ed class! She said I guess this means that we have to let them grow a little bit today doesnt it! NOW My insides are YELLING NO NOT MY BABY!! But she was right!!

So after she passed her test and with drivers license in hand we headed home! Where MOM being the pillar of strength that I was (as my knees were quivering) handed over the treasured keys! And said "Katie go have some fun and show off your drivers licenses to some of your friends!" Ok now I just earned myself the "Cool Mom" award right????

Now mind you while she was gone (a whole two hours LOL) I had to call her at least 4 times to make sure she was still alive, the car was in one piece, and that she was behaving! LOL Not too much of a mother hen was I?

So needless to say my daughter made it home in one piece! With drivers license in hand! And a nervously waiting Mom patiently waiting for her! So round one goes to Mom!! Now comes tomorow! She is going to be driving around filling out job applications! MY BABY GETTING A JOB!! Say it isnt so!!

Lord help I need a NICE hot bubble bath! LOL LOL

Tuesday, June 10, 2008

Tattered Star and Crow E-Pattern


In our April 2008 Issue Susan Greer of Cats in the Barn shares with us this great E-Pattern above! Her Tattered Star and Crow! To download this great pattern including instructions and materials lists please visit us by clicking here

String of Stars and Bells E-Pattern May 2008


In our May 2008 Issue Susan Greer of Cats in the Barn shares with us this great E-Pattern above! Her String of Stars and Bells just in time for Fourth of July! To download this great pattern including instructions and materials lists please visit us by clicking here

Star Door Hanger E-Pattern-June 2008


In our June 2008 Issue Susan Greer or Cats in the Barn shares this wonderful E-Pattern above! For the complete pattern including instructions and materials lists please be sure to download the June 2008 Issue by clicking here

Let’s Go Garage Saling!


Let’s Go Garage Saling!

By Laurie Johnson of Prindle Mountain Primitives

With the prices of gas, groceries, and nearly everything else skyrocketing lately, our family is planning to stay close to home this summer. There are still many ways to have fun this summer right here in our hometown, however. A fun afternoon pastime of ours is scouting out garage sales.

If you’re a primitive lover like me, this is a great place to pick up old rusty bread pans or muffin tins. Fill with coffee beans, rosehips, etc., and nestle votives inside.

Also watch for picture frames that can be painted and distressed to hold stitcheries. A friend of mine likes to pair up an old glass candy dish with an antique wine goblet

To read the rest of this article please download our latest edition by clicking here

Six Easy Ways to Increase Your Craft Sales

Six Easy Ways to Increase Your Craft Sales
By: Louise Longworth

Whether you sell your crafts at craft fairs, home parties or another face-to-face outlet, these six easy ways to increase sales will come in useful. I’m definitely not a born sales person, so these tips will help those of you who, like me, don't like to be 'pushy', but still want to maximise your sales.

1. No false modesty

When customers compliment you on your creations, thank them, rather than getting embarrassed and mumbling that actually it’s not that great, anyone could do it, etc. Be proud of your crafts and don’t be afraid to tell people about the high quality and unique features.


2. Honest benefits

Let people know about the benefits of your crafts, especially if they’re applicable to that customer. And if something looks really good on a guest, tell them so! Give them a good reason to buy something for themselves.

As long as you keep it honest, you’re helping your customers, so they won’t mind. The same goes for pointing out matching items or special offers.


3. Touchy feely

Increase your craft sales by letting your customers touch, smell or try on your items if it's appropriate. If I see someone looking at a piece of my jewellery I always encourage them to try it on - they think I'm doing them a favour by letting them wear it, and it's one of the easiest ways to make the sale.

Similarly, if your craft is wearable always wear some samples yourself - it always looks better on a real life model.


4. Make the most of special occasions

If Mother’s or Father’s Day is coming up, remind your customers! Point out which items would make good gifts for these occasions. Make sure you’ve got plenty of Christmas themed crafts on display from October onwards.


5. Good range of prices

Have a good variety of prices, from inexpensive stocking fillers to your top of the range craft item. It’s always a good idea to have a few inexpensive items near you that people can add on at the last minute. If someone is spending £9, they’ll usually be more than happy to add a £1 item on to round it up to £10. Key-rings, bookmarks or greeting cards are some ideas for these, or try fridge magnets with mini versions of your crafts. You’ll find these small amounts add up quickly and make a big difference to your overall sales.

But equally, you should always have a few of your more expensive crafts available. Sometimes a guest is looking for a very special gift for someone and wants to spend a bit on it, and you don't want to miss out on that sale! Having higher priced items also gives an impression of overall quality - you don't want to be confused with cheap imports!


6. Be friendly

This is one of the best ways to increase sales. Just as in any selling outlet, smiling and being friendly is probably the most important thing you can do. If customers like you they’ll be happy to support you, but if you’re hiding in a corner, grumpy and monosyllabic they’ll take their business elsewhere. Wouldn’t you?

Article by:

Louise Longworth works from home selling her handmade jewelry at home parties, and has published a website to help other crafters do the same. Craft-Selling-Parties.com

Craft Ideas For Kids - Kids and Pasta

Craft Ideas For Kids - Kids and Pasta
By: Audrey Okaneko

Pasta is not just for tomato sauce. My kids loved pasta for many different art projects. Next time you find a sale on pasta grab several varieties. Here are just a few ideas of what kids can make with pasta.

Photo frames - We use either the bow tie pasta or the shell pasta. Start with thick cardboard. I tend to use white so that we can add any color we want. Your frame can either be circular or square. Cut out the frame, this is the actual full size you’ll want at the end. Then cut out the middle to fit the size of the photo you want to put in there.

Now decide if you want to spray paint the pasta or use food coloring. Gold metallic spray paint looks great. We have also made various colors of pasta and made rainbow frames.

If you want to turn your frame into a magnet, add some magnetic tape to the back.

Necklaces and Bracelets – Penne pasta and macaroni noodles make wonderful necklaces and bracelets. I suggest fishing line. It just doesn’t break. As with the frames, you can use multiple colors of pasta by adding food dye or you can spray paint the pasta, allow to dry and then string the pasta onto your fishing line.

Decorative Jars - Save empty jars. Then fill the far with an assortment of shapes and colors of pasta. These jars make pretty decorations for bathrooms, bedrooms or even end tables.

Pipe Cleaner Figurines - Grab a pipe cleaner. Now arrange pasta on the pipe cleaner to create people and animals. Mix and match shapes and sizes and then bend to create almost anything.

Self Portraits - Use spaghetti and linguini. Boil just until soft. Then press the pasta onto construction paper into a self portrait. You can also create landscape scenes using the soft long noodles.

These are just a few ideas of how to use pasta to create great art projects made by kids.

Article by:

Audrey Okaneko is mom to two girls. She can be reached at audreyoka@cox.net or visited at www.scrapping-made-simple.com

Craft Barter Exchange To Pay For Services Or Products

Craft Barter Exchange To Pay For Services Or Products

When I started my business I didn't have a big budget for advertising, but it was obviously necessary, so I would seek out other small businesses where I could make contact directly with the owner to discuss the option of paying for advertising not in cash or on credit, but with products of mine to the value of the service.

For example, we have a local A5 booklet dropped in our mail boxes once monthly which is purely advertising - the first half is devoted to home improvement services, and the second half to other local products and services, which I noticed also included advertising for craft and handmade items. I picked up the phone and contacted the company who prints and distributes the booklet, and was pleasantly surprised to find that it was all run by one woman, so we started chatting... I ended up with a full color half page ad which was very successful, and which ended up costing me less than half the full price!

You see, the beauty of barter exchanging your products for services is that you're trading them at their retail value, but that's not what they're costing you to make them!

Craft barter exchanges can be used to pay for many different services which can either help boost your business, such as advertising, or services/products which are just necessary, such as getting business cards printed.

Whether you have the budget for these things or not, always try to negotiate a barter exchange wherever you possibly can - you will save a lot in the long run, which can then be put towards more advertising or promotional activities.

Craft Barter Exchange To Boost Sales

Upselling is a term you should be familiar with (if not, go research it now!) and is usually limited to your own products, but let's do some thinking outside the box...

If you find someone who sells products that are complimentary to yours, they can work well as good incentives for upsells - here's an example:

You have a booth at a craft fair or market, and a customer is admiring your handmade jewelry. She'd really love to go home with your beautiful (most expensive) jeweled necklace, which she knows is going to match her evening gown just perfectly, but she's hesitating because of the price.

You, however, have barter traded with a crafter who makes handmade purses - for just this reason! You approach your prospective customer and suggest that if she'd like to purchase that necklace, you'll also let her have this lovely evening purse which matches the colors of the necklace fabulously... sold!

There are many other examples - offering free fancy gift packaging or handmade greeting cards if the item is being bought as a gift; a free dining table candle if someone is buying handmade napkin rings, or vice versa; even seasonal promotions such as free Christmas tree decorations with something purchased at that time of year.

Use your imagination to find items that are complimentary to yours, and when you introduce the idea of doing a barter exchange with another crafter s/he will probably thank you for sharing the idea too!

Article by:

If you'd like to participate in and benefit from craft barter exchanges, browse our Craft Barter Directory and get listed free!

Summer Rolls with Sweet Chili Dipping Sauce

Summer Rolls with Sweet Chili Dipping Sauce

3 ounces Vietnamese cellophane noodles, cooked according to package directions
2 cups bean sprouts
2 carrots, julienned
1 large beet, julienned
1 fresh red chile, cut in circles
2 handfuls fresh cilantro, hand-torn
3/4 cup chopped unsalted peanuts
2 teaspoons dark sesame oil
1 lime, juiced
Sea salt
20 (8-inch) round rice paper wrappers
40 mint leaves

Put the cellophane noodles, vegetables, cilantro and peanuts in a large bowl; toss with sesame oil and lime juice to give the filling some flavor; season with salt and pepper.

Pour 3 cups of hot, not boiling water in a large shallow bowl. One at a time, immerse the rice paper wrappers in the hot water for 10 seconds to soften, then place on a slightly damp towel. The rice paper is very delicate, don't soak them any longer or they will break apart. Keep them covered while you work to prevent them from drying out and curling.

To form the rolls, lay a rice paper wrapper on a flat surface. Grab a small amount of the cellophane and vegetable mixture and lay it across the bottom third. Use less filling than you think you should, if you overstuff the wrapper it will tear. Carefully fold the bottom of the wrapper up to cover the filling. Fold in the left and right sides, then tuck and roll it over once. Lay 2 mint leaves on top, then tuck and roll it over to close the whole thing up like a tight cigar. The mint leaves should show through the transparent rice paper. Arrange the finished rolls on a platter and cover with a damp towel.

Sweet Chili Dipping Sauce:

1/4 cup rice wine vinegar
2 tablespoons fish sauce
1/4 cup hot water
2 tablespoons sugar
1 lime, juiced
1 teaspoon minced garlic
1 teaspoon red chili paste, such as sambal

In a blender, puree the rice wine vinegar, fish sauce, hot water, sugar, lime juice, garlic, and chili paste until combined. Pour into a small bowl and serve with the summer rolls.

Yield: 1 cup

Saturday, June 07, 2008

Some FREEBIE E-Patterns

These are Free E-Patterns
©Denise Bailey KKL Primitives
Click on Photos to Download Files
Files are in pdf format, you will need Adobe Reader to open them.
http://www.adobe.com/products/reader/
Prim Fabric Sunflowers Tutorial
This tut is for sunflowers only. Directions for making box light are not included. Photo is for display purpose only.


Wooly Sheep Ornie Hanger


Fabric Scrap Prim Easter Eggs

Lighted Jar Lamp


Lighted Jar Lamp

By Denise Bailey

Supplies Needed

cracker jar or similar sized jar

1 set of 35 clear mini-lights

bag of potpourri

rosehips

crocheted or lace doily approx. 15 inches round

large rubber band

1/2 inch wide strip of homespun, 36 inches long

power drill

diamond drill bit

spray bottle of water


To make this lighted jar lamp, I had my husband drill a hole through a large cracker jar that I picked up at a fleamarket for $2.00

To drill a hole through glass, you should always first protect your eyes by wearing some kind of eye protection, like goggles.


You will need a power drill and diamond drill bit. As you are drilling, you must keep the area damp. The reason for this is that grinding glass creates a lot of heat. You need to keep the area that you are drilling wet/lubricated. You can use a turkey baster filled with water or spray bottle of water.


Place a piece of masking tape over the area where you want your hole. Do not place it too close to the bottom of your jar. Place a heavy towel under your jar to cushion it.

When drilling, go very slow and apply light pressure. Your hole only needs to be large enough to fit the wires of your mini-lights through.


After hole is drilled, you will need to remove the plug from the wires so that the wires can be fed through the hole from the inside of the jar. My husband usually just cuts the plug off and replaces it with a new one after he's fed it through the hole.


Here are some instructions on how to replace plugs.

http://www.ehow.com/how_2104146_replace-electric-plug.html

Make sure that the mini-lights are 'loose' in the jar, don't pack it down. Place handfuls of potpourri and rosehips in the jar, shake the jar so that they fall to the bottom, in and around the lights. fill to the top of jar. Don't pack, keep it loose so that your lights will shine through when plugged in.

Cover jar with doily, secure with rubber band. Tie homespun around neck of jar to cover rubber band.


These make excellent gifts and be sure to keep one for yourself!

www.kklprimitives.com


http://theoldecarriagehouse.com/Vendors/sites/AlleghenyPrimitives/

Featured Crafter for June Kristie Norman

Featured Crafter
Kristie & Gary Norman of
Norman's Country Creek
by Denise Bailey


Please tell us a little bit about yourself : Gary and I live in Wabash Indiana. We have 4 children, 5 grandchildren, 2 dogs (one who is a certified pet therapy dog) and an inside bird aviary. We have both taught together in the same elementary school for the past 24 years. I am retiring this year, but Gary will continue for a few more years. He coaches varsity wrestling, and loves beekeeping.


How long has Country Creek been in business?
Country Creek has been in business since 1999. However, our business began to grow when Gary became a beekeeper in 2000. He has about 20 hives and with teaching and wrestling this keeps him extremely busy.


How did you come up with your business' name?
We have a beautiful creek and a small falls running beside our house and we live on a country farm, so Country Creek seemed to be the perfect name. However, I had to name our website Norman's Country Creek, because of the domain name.


Do you sell in other venues?
We attend 9-10 craft shows a year. Our busy season is from September to the end of November. Gary sells his honey/beeswax at local health food stores, school, and customers stop by the house frequently for honey. In past years I have placed products on consignments at local shoppes, particulary my handmade paper note cards.


What kind of products does Country Creek offer to their customers?
I specialize in lamps made from gourds and decanters and lights made from hurricane vases. I have begun making my own lampshades using a very old technique called “cut and pierced.” Since I enjoy painting and making candles, I have combined the two crafts and make painted hurricane candles.

One of the newest products I have online are the oil candle kits. Several customers at our craft shows kept asking why I didn't sell my oil candles on our website. So I decided to offer them as a kit.

Sewing has always been a favorite pastime, so of course I have Raggedy Dolls. I am not a person who enjoys having idle time, so I keep myself busy crocheting in the evening, or during wrestling matches, riding in the car, etc. My grandmother taught me to crochet when I was around 13 and I still use some of her needles and books. I think of her everytime I pick up a new crochet book.
I have always loved to make handmade paper. I hope to add handmade paper note cards in the near future. I sold them for about 5 years, and have had customers requesting them again. I generally make paper from recycled paper, but I have tried making paper pulp from grasses, irises, and certain weeds. I do give paper making demonstrations at local clubs and find it very relaxing to make paper.

Of course Gary offers raw honey in different sizes and beeswax, which is great for a variety of uses.

Are all of your products handcrafted? Yes
Which ones? I make everything but the small tinpunch night lights, and the bases for the Cut & Pierced lamp shades.


What products seem to be your best sellers?
Craft shows and the website are completly different.. The Glass Mini-lamps, and painted hurricane vases are our best sellers at craft shows. However, the best sellers on the website are my raggedy dolls and the painted hurricane globes.

Do you offer wholesale?
I have had lots of requests for wholesale, but haven't decided to offer that option at the moment.

What methods of advertising do you use to promote your shoppe?
I advertise through a variety of online market sites and of course advertise through my own online craft mall site: Honey Creek Market. I am also advertising in the Aug/Sept issue of "Country Sampler" magazine. I always offer discount coupons at all our craft shows.


When sales are slow do you do anything special to try to bring customers in to your shop?
When sales are slow, I try to offer discounts, or reduce shipping costs. But I think the best thing is not to get discouraged, because business will pick up eventually.


Do you have any advice for those who might be thinking about opening an online shoppe?
I have found this business can be very rewarding, yet also time consuming. You must constantly promote, promote, promote and connect with other sites as much as possible. Stay motivated
and don’t give up!


Do you have any advice on what NOT to do?
Don't quit after the first few months, and you MUST advertise. Unfortunately it takes quite a bit of advertising to see a return.


How many hours per day or week would you say you spend working on your crafted products and on your website?
Since I have 2 websites, it takes me about 1 1/2 hours per day on the computer. Now that I am retiring I intend to spend a lot more hours (4 or more) daily working on products, especially my sewing.

Do you have any future plans for expanding your online shoppe? Perhaps opening your own brick & mortar store?
I am thinking about starting another online shoppe sometime next winter. I have a few more ideas, but haven't finalized anything at the moment.


Visit Kristie today at Normans Country Creek just CLICK HERE

Primitive TImes Magazine June 2008 Issue


We have TOTALLY Redesigned our Magazine!
Not only does it look Beautiful! But it has GREAT content too! We are taking ads
for our July issue and we have already filled half of our spots so please please
get your ads in asap! With your July Ad you can include a FREE coupon PLUS get a
Full page on our site with up to 9 product photos if you purchase a 1/4 ad or
larger! So click here to reserve your spot in our beautiful NEW Magazine!
Click here to reserve your Spot today!


Also if you like our magazine and enjoy
it every month consider making a donation to help offset the cost of production!
Just click the button below and donate ANY Amount you want! Thank you


Inside our June Edition


There are TWO Great E-Patterns


A 10 Page Home Tour with wonderful photos


Pages Filled Yummy Recipes


WAHM and Primitive Crafter Business
Advice


Featured Crafter- Kristie Norman


Spotlight Ads


And Sooo much more!


Click to download our
latest edition HERE


Help Promote
Primitive Times Magazine by adding our graphic below to your site and linking it
back to Primitive Times Magazine just click the code in the box and you are all
set!


<a href="http://www.primitivetimesmagazine.com"><img src="http://i162.photobucket.com/albums/t279/primtalk/NEw/PTMmagazinedownload.gif">

Tuesday, April 08, 2008

Primitive TImes Magazine-HAS A NEW LOOK STOP BY

We are thrilled to announce we have a NEW bigger and better site!
As we were creating our new site our old crashed so I apologized
for the downtime!

Our new site has WONDERFUL new features you all will love!
1-NEW Community Forum built right into our site

2-Automatic Link Exchange-Come Exchange links with us!

3-NEW Article Directory so you can see all the great articles
posted with more to come this weekend

4-NEW Submit form so you can send us in your articles or recipes
you would like to submit to earn FREE advertising

5-NEW Product Review where we will be posting our PAST reviews and
a information if you would like to have your reviews added!

COMING SOON in the next day or so

1-Craft Mall Directory for FREE where you can list your site in our
directory for added exsposure for FREE

2-Home Tour Gallery-We will be adding ALL of our past home tour
photos and information up please INFO on how you can get your home
featured on our site

Stop by our new site and let us know what you think! If you have
ideas for things you would like to see added just contact us!
Have a wonderful weekend and the new issue will be up by Monday I
am sorry on the delay with the site crashing and my a ill family
member I am finishing it up as speak!

Primitive Times Magazine

April 2008 Issue


Click on Cover to download April Issue

In this Issue

  1. Mother's Day T Shirt Article
  2. Chocolate Wacky Cake
  3. Scrapbook Layout Sketches
  4. Scrapbook Layout
  5. Tattered Star and Crow Pattern
  6. Prim Jar Labels Download
  7. Prim Bottle Cap Images
  8. Featured Crafter-Lisa from Primsy Doodles Design
  9. 6 Red Hot Tips to get your articles read
  10. Tips for Having a Great Garage Sale Experience
  11. Recipe Corner
  12. Finding the Right Consignment Shop
  13. Grubby Fruit Craft Project
  14. Primitive Times Magazine NEW website Info

  15.  


Wednesday, April 02, 2008

Tea Staining Fabric

Tea Staining Fabric


Tea staining has been around a long time and was first used to
hide stains on linens. It is one of the most popular ways to
stain fabric and gives it a warm antique look. Different types
of teas such a green tea, black tea, rasperry and herbel teas
will give you different tints and tones on fabrics so don't be
afraid to experiment a bit. Hibiscus tea will give you red tones
while black teas give more of a soft brown or cream tone to the
fabric. Tea staining works well only on natural fabrics- muslin,
cotton, linen and wools dye well. It is very easy to do and just
takes a few simple steps


If you
fabric is new be sure to wash it first to remove the sizing
before dying.I have found 4 cups of water and 4 single cup tea
bags will dye one yard of fabric.


Bring the water to a boil and remove from heat add tea and let
set for about 5 minutes until the liquid turns the desired
color. Remove the tea bags from the water if you dont the tea
bags may make dark stains on your fabric


Wet the fabric in water thoroughly, removing excess before
putting in the tea mixture- stir gently


Let soak for about 10 minutes checking to see if the fabric is
dark enough. Remember you fabric will dry a shade lighter.


When fabric has reached the desired color remove from the tea
mixture and rinse well with warm water and a mild dish soap- if
you don"t the fabric may become damaged by the tea- tea contains
acid which can destroy fibers over time


Line dry or place the fabric in the dryer. I like to put the
fabric in an old pillowcase to protect my dryer and if Im going
to put in white clothes right after I will wipe the dryer out if
it jeans I just don't worry


When the fabric is dry if you want it darker repeat the process
, if the fabric is too dark wash the fabric in a gallon of water
to which you have added 1 tablespoon of bleach this will lighten
the fabric- rinse thoroughly and redry


If I am going to use the fabric for something that is going to
be washed I will soak it in a gallon of cold water to which I
have added 1 tablespoon of vinegar to set the color.


Have fun tea
staining - remember the possibilities are endless -old linens,
clothes, etc can all be tea stained

!


Rusting Items By Debbie

Rusting Items
by Debbie

This recipe
will nicely rust safety pins, jingle bells, or anything else you
want 'age' for your primitive creations. The most important
thing to remember about rusting, is that you will want to buy
the cheap brand of pins, bells ...etc that you can find. The
more expensive brands have a shellac coating on them that you
will have to sand off before rusting. Makes sure they are NOT
brass either-brass will not rust. Do this outside away from
children and pets... and fumes are terrible!


Ingredients:


1/2 cup cider
vinegar

1/2 cup bleach


1 teaspoon salt


Directions:


Combine the
ingredients in an old quart jar.


Add items you
want to rust and cover loosely-place in a safe spot and let set
for at least 2 days.


Line a tray
with a couple of layers of paper towels and remove the items
with an old fork from the mixture. Place in the sunshine... the
items will begin to rust as they dry. Move them around so that
they dry on all sides.


Perfectly
rusted bells, pins, and any other item you wish to rust.


CAUTION: Do not
throw the mixture down the sink- dispose of properly where no
animal or child could come in contact with.


Written by Debbie Hainline- Two
Old Crows (
www.2oldcrows.com)


If you fabric is new be sure to wash it first to remove the
sizing before dying.I have found 4 cups of water and 4 single
cup tea bags will dye one yard of fabric.


Bring the water to a boil and remove from heat add tea and let
set for about 5 minutes until the liquid turns the desired
color. Remove the tea bags from the water if you dont the tea
bags may make dark stains on your fabric


Wet the fabric in water thoroughly, removing excess before
putting in the tea mixture- stir gently


Let soak for about 10 minutes checking to see if the fabric is
dark enough. Remember you fabric will dry a shade lighter.


When fabric has reached the desired color remove from the tea
mixture and rinse well with warm water and a mild dish soap- if
you don"t the fabric may become damaged by the tea- tea contains
acid which can destroy fibers over time


Line dry or place the fabric in the dryer. I like to put the
fabric in an old pillowcase to protect my dryer and if Im going
to put in white clothes right after I will wipe the dryer out if
it jeans I just don't worry


When the fabric is dry if you want it darker repeat the process
, if the fabric is too dark wash the fabric in a gallon of water
to which you have added 1 tablespoon of bleach this will lighten
the fabric- rinse thoroughly and redry


If I am going to use the fabric for something that is going to
be washed I will soak it in a gallon of cold water to which I
have added 1 tablespoon of vinegar to set the color.


Have
fun tea staining - remember the possibilities are endless -old
linens, clothes, etc can all be tea stained !


Debbie
owns "Two Old Crows" (www.2oldcrows.com) where she sells her
handpainted folk art and other handcrafted items she makes along
with antiques, primitives and vintage collectibles


Tax Tips for Work At Home Moms

Tax TipsAs we start our tax filing and getting our receipts and forms ready to file it got me thinking on how as Work At Home Mom’s we can make next years tax filing a little easier and more organized. If you are like me I was waiting until the last moments to gather all my paper work and receipts and I even had to search for a couple of my receipts.

As a work at home mom with a business generating income it is very important and almost crucial that you have some sort of financial software to help you keep track of your book keeping such as Quick Books or Quicken. The financial software will help you keep track of all your expenditures and income coming into your accounts from your online business. Which will make your tax time a snap next year?

Here are some tips to help you save a little money on your taxes for next year!

1-Purchase your high priced items that you may need to replace equipment this year by Dec 31st so that you can use this as a tax write off on your next years taxes. Another words if it is December and you know you need to purchase a new computer next year, buy it this year to help increase your expenses and thus lowering your taxes. Same goes with your household expenses if you work from home, pay all your bills in December instead of waiting for January just to add more deductions on your 2008 taxes for example your mortgage payment, insurance payments taxes and more.

2-Donations- Donate your old equipment or kids clothing or household items this year and keep a running total of everything you donated so that you can use it next year on your tax returns. Thus helping to increase your deductions.

3-Try to keep a separate checking account or paypal account for your business use, so at the end of the year it makes your book keeping much easier. Although I have paid for items out of my personal accounts I make sure if I paid for something out of my personal account that I keep my receipts and mark my receipt accordingly to show the purchases were for my business use.

4-Don’t overlook deductions that apply to you! One of the most overlooked deductions for Work At Home Moms is your mileage! YES you work from home but you can deduct your mileage attending workshops, running to the office supply store, the post office if you send out lots of packages and more! If you plan on deducting your mileage keep a mileage book in your car so that is within reach when you are driving for business purposes and can keep an accurate record of your mileage to and from your business stops.

5-Start Up Expenses if you were a new business in 2008 you can deduct up to $5000 in start up expenses the key is the deductions can only be made before you made your first dollar! These expenses can be advertising, attorney costs, accountant, supplies and equipment.

6-Home Office Expense- Don’t forget if you work from home remember you can deduct your area of home that use for your business. It use to be a HUGE red flag for the IRS but over the last five years this is not true as more people are starting to work home and this can be a huge deduction because you can deduct a portion of your utilities and mortgage payments and tax and insurance payments

7-Keep your tax books current and up to date you should try to site down once a month and make sure you have added all your expenses and income coming in so that at the end of the year you are not back tracking

8- Pay your taxes quarterly so that you are not having to owe a large sum of money at the end of year! The best way to do this is to figure out approximately what your income will be and pay in your taxes that way.

February Issue of Primitive Times Magazine


February Issue Click Here to Download


Inside this edition you will see our


Meet the Editors,


A Fibre Arts Book Review,
A Farm Story,

A Primitive Lamb Sampler,


A Lam b E pattern,


Using Beeswax on
your Paintings,

Valentines Paper Crafts,


Bonny Bunny Pattern and Instructions,
Tons of great recipes,

Analyzing Website Traffic Article,


Goal Setting for the
new year,

Good Versus Bad Web Design,


and Are you afraid of pattern making
amongest Many other great articles!

Click on the link above or the magazine
cover to download your issue today!

December Edition of Primitive Times Magazine


Click here to download our latest issue

January Edition of Primitive Times Magazine


Click here to download the latest issue

Old Fashioned Soap Balls


Old fashion soap balls can be created
easily using either ivory or dove soap bars, they have the look
and feel of old soap. For a more grungy looking soap ball roll
them in spices such as cinnamon before they are completely set
up (Caution do not use if you do this your skin may have
allergic reaction to the spices- display only)


Ingredients:
1 cup of instant Quaker oatmeal
1 bar of ivory or dove soap
1/4 cup of water


Grind up the oatmeal in a food processor until finely milled but
do not grind to flour you want it chopped up enough to break up
the oatmeal flakes but still be visible


Grate the bar of soap into small slivers
Place the soap and water into a large microwavable bowl and
microwave on high for 2-3 minutes. Stir the mixture once or
twice making sure it does not bubble over


When the soap is dissolved remove from the microwave and add the
ground oatmeal slowly stirring constantly


Let cool enough to touch then form into balls placing on wax
paper to set and dry. It will take about 2 hours for them to
set.


Oatmeal soap balls have a great
old fashion look and can be displayed in old soap dishes,
vintage jars, wooden bowls and baskets in primitive or country
bathrooms or kitchens.


Debbie
owns "Two Old Crows" (www.2oldcrows.com) where she sells her
handpainted folk art and other handcrafted items she makes along
with antiques, primitives and vintage collectibles


Sweet Potato Garland

Sweet potato garland is a wonderful accent to primitive or country decor. Stringed sweet potato garland is perfect for hanging on a primitive tree or as garland on a fire place or doorway. I don’t suggest putting it outside unless you don’t mind the varmit and birds eating it.

Supplies:
Sweet potatoes ( you can use regular potatoes)
Instant coffee
Spices- nutmeg, ginger and cinnamon
Cotton string
Needle


First make your coffee staining mixture
3 heaping tablespoons of instant coffee (I have found that the more expensive coffee gives a deeper stain)
1 cup of boiling water
Mix the two and let steep for a few minutes


Stain your piece of cotton string with this mixture by dipping it in and letting it dry ( I would not do a garland more than 6 feet long) dry this completely.

Do not peel the potatoes but just cut into 1 inch cubes

Mix equal amounts of your spices together in a pie pan

Soak the cubes of potatoes in the coffee mixture then roll them in the spices covering thoroughly ( I like to roll them all once and then roll again)

Tightly string the cubes together because they will shrink while drying

You can let these air dry or place in a 150 degree on a cookie sheet. Be sure to keep checking and scrunching them together as they dry to prevent gaps. ( Have found they are impossible to move on the string after drying)

These are a wonderful addition for fall decorating