Showing posts with label primitive crafts. Show all posts

Saturday, August 30, 2008

Prim Friends Network


Looking to promote your craft business website or blog for free?
Whether you craft primitive, whimsy, vintage or shabby chic... Prim Friends Network is the place to visit & network from.
Each week a crafter will be featured and there will be a drawing for a give-a-way.
If you are interested in 'networking', send Shari, the owner of Prim Friends Network your 125x125 button banner. In return you need to set up a Prim Friends Network link on your site. This can be text only, or you can be as elaborate as you would like with pictures, banners, etc. The only requirement is that you do it! This is a Network and it doesn't work if it's members don't "Network"!
Let's work together to promote crafting AND your business! Visit Prim Friends Network today!

Thursday, August 21, 2008

Grubby Electric Candles

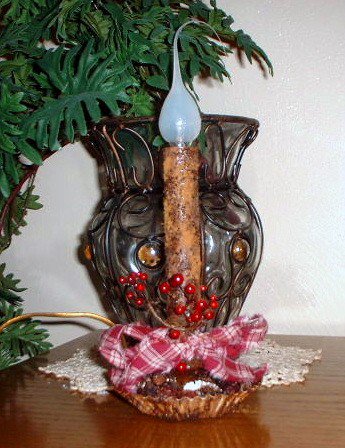
These grubby candles are fun to make! This is one of the first ones I made a few years back.
I picked up some old electric candles at yard sales and flea markets . Sometimes you can find them at dollar stores too.

I took some sandpaper and sanded down the candle, then painted it with brown acrylic paint. When it dried, I painted it with Mod Podge and then rolled it into a mixture of instant coffee, real coffee grounds, ground cinnamon, nutmeg and cloves.

When that was dried, I would paint on some more Mod Podge sporatically and 'drizzle' more cinnamon over that.
Once dried, I painted with another coat of Mod Podge to seal the coffee mixture.
I purchased a fluted candle pan and glued the candle to that with clear Liquid nails. I tried hot glue and didn't like the results. Didn't hold good enough.
I tied a strip of homespun around the base of the candle and attched some red pip berries. Then filled the candle pan with scented rosehips.
I replaced the bulb that came with the candle with a silicone coated bulb.

Saturday, June 07, 2008

Some FREEBIE E-Patterns

These are Free E-Patterns
©Denise Bailey KKL Primitives
Click on Photos to Download Files
Files are in pdf format, you will need Adobe Reader to open them.
http://www.adobe.com/products/reader/
Prim Fabric Sunflowers Tutorial
This tut is for sunflowers only. Directions for making box light are not included. Photo is for display purpose only.


Wooly Sheep Ornie Hanger


Fabric Scrap Prim Easter Eggs

Wednesday, April 02, 2008

Rusting Items By Debbie

Rusting Items
by Debbie

This recipe
will nicely rust safety pins, jingle bells, or anything else you
want 'age' for your primitive creations. The most important
thing to remember about rusting, is that you will want to buy
the cheap brand of pins, bells ...etc that you can find. The
more expensive brands have a shellac coating on them that you
will have to sand off before rusting. Makes sure they are NOT
brass either-brass will not rust. Do this outside away from
children and pets... and fumes are terrible!


Ingredients:


1/2 cup cider
vinegar

1/2 cup bleach


1 teaspoon salt


Directions:


Combine the
ingredients in an old quart jar.


Add items you
want to rust and cover loosely-place in a safe spot and let set
for at least 2 days.


Line a tray
with a couple of layers of paper towels and remove the items
with an old fork from the mixture. Place in the sunshine... the
items will begin to rust as they dry. Move them around so that
they dry on all sides.


Perfectly
rusted bells, pins, and any other item you wish to rust.


CAUTION: Do not
throw the mixture down the sink- dispose of properly where no
animal or child could come in contact with.


Written by Debbie Hainline- Two
Old Crows (
www.2oldcrows.com)


If you fabric is new be sure to wash it first to remove the
sizing before dying.I have found 4 cups of water and 4 single
cup tea bags will dye one yard of fabric.


Bring the water to a boil and remove from heat add tea and let
set for about 5 minutes until the liquid turns the desired
color. Remove the tea bags from the water if you dont the tea
bags may make dark stains on your fabric


Wet the fabric in water thoroughly, removing excess before
putting in the tea mixture- stir gently


Let soak for about 10 minutes checking to see if the fabric is
dark enough. Remember you fabric will dry a shade lighter.


When fabric has reached the desired color remove from the tea
mixture and rinse well with warm water and a mild dish soap- if
you don"t the fabric may become damaged by the tea- tea contains
acid which can destroy fibers over time


Line dry or place the fabric in the dryer. I like to put the
fabric in an old pillowcase to protect my dryer and if Im going
to put in white clothes right after I will wipe the dryer out if
it jeans I just don't worry


When the fabric is dry if you want it darker repeat the process
, if the fabric is too dark wash the fabric in a gallon of water
to which you have added 1 tablespoon of bleach this will lighten
the fabric- rinse thoroughly and redry


If I am going to use the fabric for something that is going to
be washed I will soak it in a gallon of cold water to which I
have added 1 tablespoon of vinegar to set the color.


Have
fun tea staining - remember the possibilities are endless -old
linens, clothes, etc can all be tea stained !


Debbie
owns "Two Old Crows" (www.2oldcrows.com) where she sells her
handpainted folk art and other handcrafted items she makes along
with antiques, primitives and vintage collectibles


February Issue of Primitive Times Magazine


February Issue Click Here to Download


Inside this edition you will see our


Meet the Editors,


A Fibre Arts Book Review,
A Farm Story,

A Primitive Lamb Sampler,


A Lam b E pattern,


Using Beeswax on
your Paintings,

Valentines Paper Crafts,


Bonny Bunny Pattern and Instructions,
Tons of great recipes,

Analyzing Website Traffic Article,


Goal Setting for the
new year,

Good Versus Bad Web Design,


and Are you afraid of pattern making
amongest Many other great articles!

Click on the link above or the magazine
cover to download your issue today!

December Edition of Primitive Times Magazine


Click here to download our latest issue

Monday, September 03, 2007

Primitive Times Magazine Sept Issue Is Ready


Our September Issue was full of great Craft Ideas!

Full of wonderful crafts and business articles, Table of Contents Below:

Inside This Issue:

Introduction and Welcome by Angie—Page 2

An En "Lighting" Lesson—Page 3

Assorted Recipes and Crafts—Page 4

Beat Some Stress—Page 5

Fall Potpourri Balls-Page 5

Featured Editor DIanne—Page 6

Amish Country Getaway—Page 7

New Salem Getaway—Page 8=9

Unique Uses for Vodka—Page 10

FREE Fall Patterns—Page 10

Information on FREE Advertising —Page 11

The HUNT By MIchele—Page 12

Eckerts Farm Trip—Page 13-15

Wandas Country Farmhouse Ad—Page 16

Spotlight Ads—Page 17

Country Folkart Marketplace Ad—Page 18

Spotlight Ads-Page 19-21

Fre Fall Graphics —Page 22

Great Fall Recipes=Page 23

The Keeping Room-Page 24

Click here to download the latest version

Friday, August 17, 2007

How To Create Fabric 'Prim' Sunflowers'

Materials needed:
muslin
scissors
Mark B Gone pen
needle
upholstery thread
1 small coffee can plastic lid
1 lid from pringles can or similar size
coffee stain*
cookie sheet & foil
polyester filling

*Coffee Stain
3 Tablespoons instant coffee to 1 cup hot water
2 Tablespoons vanilla
note : for grungy sunflowers add approx. 1/4 cup or more of cinnamon. Mix and let sit. After a short while the cinnamon will form a 'sludge' on the bottom of your pan. This sludge is what you apply to get the grungy dirty look.

Directions:
With your Mark B Gone pen, trace out 4 large circles using the larger plastic lid as your template. Trace 1 small circle with the smaller plastic lid.
Using the tracing line as your cutting line, cut out all circles.

Photo Sharing and Video Hosting at Photobucket
Place the 4 larger circles on top of each other. Center the small circle over these and pin in place.
Photo Sharing and Video Hosting at Photobucket
Thread needle with upholstery thread, knot and come up under the small circle to hide the knot. Begin basting the small circle, being sure to go through all layers of muslin. Leave about a one inch opening to insert polyester fill.
Photo Sharing and Video Hosting at Photobucket
Stuff lightly with polyester fill as shown in photo
Photo Sharing and Video Hosting at Photobucket
Stitch opening closed.
Photo Sharing and Video Hosting at Photobucket
With scissors, cut from outer edge of larger circles just to the beginning of the small circle, being careful not to cut through it.
Photo Sharing and Video Hosting at Photobucket
Continue cutting all the way around circle.
Photo Sharing and Video Hosting at Photobucket
Emerge sunflower into coffee stain, being sure to flip so both sides are soaked through. Let sit a minute or two.
Photo Sharing and Video Hosting at Photobucket
Take sunflower out of stain, squeeze excess moisture out and place on foil on cookie sheet
Photo Sharing and Video Hosting at Photobucket
Place cookie sheet in low oven (about 200 degrees ) to dry. Turning often so sunflower won't burn. When dry remove.
Start pulling apart the 4 layers of 'petals'
Photo Sharing and Video Hosting at Photobucket
To finish:
You can leave sunflower as is, or you can grubby it up by painting on the sludge and more coffee stain and returning to oven to dry.
You can paint the puffed up inner circle with a brown paint. When dried, dry brush the edge with black paint. I added some orange and gold to this one as well.
Photo Sharing and Video Hosting at Photobucket
For variety, instead of a muslin center, use homespun.
Photo Sharing and Video Hosting at Photobucket
This is a sunflower & crows cheesebox light I made with my sunflowers
Photo Sharing and Video Hosting at Photobucket
To make a larger sunflower you can use dinner and dessert plates as your template like I did for this sunlower nodder.
Photo Sharing and Video Hosting at Photobucket

Sunday, April 22, 2007

Improve Your Craft Sales Results

Improve Your Craft Sales Results
By: Liza Schmitt

Want to improve your craft sales results?
You have to change the process to change the results.

It's estimated (and I can well believe it) that of every ten sales people, only three will actually ask for the business. Of those three, only one will be successful in closing the deal. Are you the one who makes the sale, or are you part of the nine who don't?

If you're in business for yourself, it's because you have something to sell. Are your results what you expect or would like them to be? Do you think (or know) that you could do better?

Improve Your Craft Sales Results - Can You Sell?

It's a common scenario - for example: You make something that everybody loves, so you decide to start selling your products in the hopes that you'll build your little business into something big enough to sustain a full time income, but you're just not selling enough to be able to quit your job and work for yourself.

It may be that you've never been trained in sales - this is not unusual, you're an artist or crafter for a reason, if sales is what you were born to do, that's what you would be doing. It may be that you're not very comfortable with or confident at selling - also not unusual if you've never been taught sales skills and techniques, because it takes time to develop the confidence to sell when you first start out.

Improve Your Craft Sales Results - Develop Your Skills

Whatever the reason, the good news is that it's really easy to turn the situation around so that you start closing one deal after the next, resulting in a much improved cash flow!

Yes, it does take confidence, and you will build that confidence up sale by sale, because it also takes skill and technique - once you've learned how to sell, and you apply your new skills, you'll be so thrilled with the results that your confidence will grow in leaps and bounds, and so will your sales!

I'd like to share a personal anecdote on this topic, because what I'm writing about here is what I've experienced myself.

Improve Your Craft Sales Results - A True Story

At one of my previous jobs where I worked in a customer service role, my employer thought I showed promise to do more, and offered me a position in sales. I accepted, wanting to improve my earnings and climb up a notch. However, I didn't do very well at all. My employer hadn't offered me any sales training, and all the other sales consultants came from experienced sales backgrounds, so they didn't need to be trained (or so he thought).

I didn't want to lose this opportunity or fail at it, so I made some enquiries and I found a one day seminar that offered sales training for beginners. I asked my employer if he would pay for it and allow me to go - he wasn't very keen at first, but he could see how enthusiastic I was, and he was impressed that I'd been proactive instead of just giving up.

Well, that one day practically changed my life! I didn't realize it at first, of course, because the techniques seemed like such a "hard sell", and I didn't think I was confident enough to go through with it all. But little by little I started trying a few things out - a different rebuttal if a customer was giving me a reason s/he didn't want to buy; or a different introduction to the beginning of my sales pitch - and I could see that these things were having an effect on my customers, an effect that was positive for me.

Improve Your Craft Sales Results - Take Action!

A lot of people think you have to be a "born salesperson", but I can testify that isn't true. When you learn the right sales skills and techniques, and you apply them, you can become a successful salesperson. And if you want to run your own successful craft business, you have to become a successful salesperson - your business depends on it.

There are a number of ways you can go about learning the sales skills and techniques you need:

* Search the internet
* Find out what courses are offered in your area
* Browse your local library or book store, etc.

Generally speaking, not everything of value that you find is going to necessarily be free or inexpensive, but very often "you get what you pay for".

Article by:

For more free craft business info and resources, visit Craft Business Home.com - the free guide on how to turn your craft into a profitable home business!

Prim Talk Radio=April 20th Show is up!

Today’s Show:


  • Angie Murray (A New Contributor) from Angie’s Country Candles will be discussing some great Spring Scents you could use in your craft making including great places to buy your supplies.

  • Angie Wenke from Heartland Graphics will be sharing an article on how do you juggle your home life and online business. Ways you can become organized so have enough time for your family and housework also.

    Next week I will be back with another scrapbooking segment and more!

  • Renae from the Prim Clipper is back great ways to bring the Spring Indoors into your home, also some yummy recipes she wanted to share with all of you!

  • Learn about our great new Grand Opening Contest and Advertising Specials for our Grand Opening of Prim Talk Radio.

  • Thomas=Lisa's husband from the Primsy Doodles will share his new upcoming segments here on Prim Talk Radio!

  • Talena (A New Contributor) is sick this week but will be back next week!

  • Our Featured Crafter this week is Mary Jo Elliott from Fine Country Living Primitives

  • Our Featured Site is The Prim Angel Network


For more information on our Grand Opening Contest please click here


To go back to our MAIN WEBSITE please click here


[audio:http://nikibutterfly80.audioacrobat.com/download/ca5db9fe-9527-f3fe-5868-1d1e08c93115.mp3]


Click here to download…

The Primitive Olde Crow Online Crafters Mall=Showcase Shoppe


We are showcasing a wonderful online craft mall called the Primitive Olde Crow Online Crafters Mall.

The Primitive Olde Crow Online Crafters Mall is a wonderful place to advertise your Primitive or Country Business and gain a lot of exposure and attention today.

Online Craft Malls are a wonderful way to enjoy shopping for your primitive and country decor without having to leave the comfort of your own home. Simply stop by one Craft Mall like Primitive Olde Crow Online Crafters Mall and you can shop from all the many varieties of stores inside. Some of the Shopping Catagories to shop from include:

Business Resources
Candles N Fixens
Home Decor
Sewing
Primitives
Raggedies
Woodworking
Bath N Body
Florals
Crafts
Lighting
Jewlery
Patterns


Here is a brief description of their site.

Are you looking for a way to advertise your website and increase your sales? If so you have come to the right place.

We welcome you to join our family of crafters.


Advertising Package includes:

Your website name and picture listed in 3 categories of your choice.
A description of your site (50 words or less).
A link to your website.

Each month we will also chose a new featured crafter. If you are chosen you will receive a full page dedicated just to you and your store.

April Special:

Check out all the great products our crafters have to offer! We are running a special for April and May. One year of advertising for $15.00. Join now and save ten dollars off our regular price.


Stop on by Primitive Olde Crow Online Crafters Mall

Saturday, April 14, 2007

*Free* Stick Horse Pattern

To make this prim stick horse, download the pattern below by clicking on the link. This size stick horse is for using with dolls or can be used as large ornies.

click here to save Pattern


Materials needed:
muslin fabric
*Coffee Stain
jute string
2 rusty bells
black embroidery floss
thin tree branch - approx. 8" long ( can substitute dowel rod )
paint brush
sewing needle
*Coffee Stain Mixture
1 cup hot water
4 T. instant coffee
2 T. vanilla
1/4 cup ground cinnamon


Stir well and let this set while you cut and sew your pattern. You want the cinnamon to settle at the bottom of your bowl.


Directions:
Trace pattern onto muslin. The outline is the sewing line so be sure to leave at least an inch around the horse when cutting out to sew. Sew only to the small x's on the bottom of the pattern, leaving the bottom open for stuffing. You will not be sewing this closed. Trim to within a 1/4 inch of the seam and clip where needed.


Stuff horse with polyester fiberfill til firm. Stuff only to broken line indicated on pattern.


Stitch the eye with 6 strands of black floss.


Wrap jute string around muzzle and neck several times to thickness desired for the harness.


Attach two rusty bells as shown in pattern.


Place horse head over your stick/branch and with the jute string, wrap firmly beginning at the dotted line. Wrap about 10 times and tie off.


With your paint brush, brush the coffee mixture over the horses head and jute strings.


Place in warm oven ( not higher than 200) until the head is dry. Turn over every few minutes.


Thread your needle with 6 strands of black floss. Beginning in front of horse's ear, attach the 'hair' for the mane. Clip to desired length. Continue down the back of the horse's neck to the wound jute.


With your paint brush, again paint the horse with the coffee mixture, this time wiping the bottom of the bowl with the brush to pick up some cinnamon. This will give you the 'dirty' or grungy look to your horse, brush over the mane too. When completely dried, the mane will be stiff.


Place horse stick back in oven and dry. Turn over every few minutes.


Terms Of Use
You may not offer this pattern for download, instead, you may link to it. Do not sell this pattern. The copyright belongs to me and I'm offering it for free, it should stay that way.
You may sell your completed project in craft shows only. If you sell, please give credit to me as the designer. (©KKL Primitives) Thank you.


technorati tags: , , , , , , , , , , , , , , , , ,


Posted by: Neenee
KKL Primitives
The Krazy Kraft Lady Blog
KKL Graphics Blog
KKL Kreations Blog
Menopausal Monster Blog
contributing editor for:
Primitive Times Magazine a free downloadable magazine for crafters
Primitive Times Magazine Blog