Showing posts with label Ideas. Show all posts

Tuesday, November 06, 2007

Mary Jo’s Segment on our Prim Family

Hello Prim Talk Radio Listeners, this is Mary Jo with
FineCountryLivingPrimitives.com. I’m sorry I missed last week’s show. My husband
and I are opening our own brick and mortar store here on our property and we are
doing all the work ourselves to save on start up costs. What we are paying for
is our lack of extra time, and last week the days just got away from me!


I’m glad to be back this week, but I’m here with a bit of sad news. A few
months ago, Angie had a wonderful segment on joining eBay groups and networking.
I’ve been a member of a wonderful eBay group for well over a year now called
APCG A Primitive Country Gathering. Many of our contributors here and on
Primitive Times Magazine are also members, and it is a wonderful gathering of
primitive sisters and we share the love of crafting, art, and sisterhood.


Our wonderful leader since the beginning is Kassy. Kassy passed away just
this week after an illness, and it is devastating news for all of us in our very
close-knit group. She was a wonderful person, and touched each and every person
she ever met with her unending kindness, support and love.


We will miss Kassy greatly, and I want this segment to be in honor of her and
what she has taught me. This segment is going to be about our primitive
community.


Until I entered into this community of primitive lovers and crafters, I never
knew that it existed. It’s not a community located in one place, it consists of
many locations throughout our country and even our world, but brought together
with everyone’s love for primitives and things that remind us of the simpler
times.


This community ranges from the online magazines and craft malls, through to
chat rooms, eBay groups and WAHM forums where people gather to meet and chat
about our work. What ends up happening is you see one person in one forum, then
maybe when you read a great online article or hear a segment on a pod cast such
as Prim Talk Radio, you realize that it’s that person you’ve been chatting with
online for a few months. Many forums do exchanges where you are partnered up
with another member and you exchange something handmade and it’s amazing how
much you get to know a person just from that little gesture!


When I speak of our prim community with what I call “outsiders” such as my
family and my local friends and neighbors, people look at me as if I’m a bit
crazy! I will be laughing and tell them of a story I heard from one of my
friends, and they will say something like “Who?” I then usually reply, “Oh, my
online friend Michele, or Renae”, and they just don’t understand that you really
create a bond with these people.


We all share a common thread with our love of primitives, and many of us are
WAHM’s that are always there for each other when times get crazy or tough. Many
times we bounce new ideas off of each other or ask one another for opinions on
store names, or new doll ideas, because only one of us prim lovers can truly
understand what the other is saying or even thinking.


I guess that what I’m trying to say is that it is a large community online
for us crafters and prim lovers, but it is also so small when we all get to know
each other, support each other, and lend a helping hand when needed.


I encourage all of you to get involved with this little community if you have
not already. And if you have, next time you are online, say thank you to your
friends who always seem to be there when you need them most, those who truly
understand how hard it is to work from home and take care of the kids, cook
dinner and do the chores all at once. Take the time to tell those sisters in
your community that they mean the world to you, because someday, they just may
not be there to hear it.


I truly didn’t want this to be a sad segment, and I’m sorry if it sounded
like it was. I want this segment to be a reminder of how special so many of you
are and to continue to enjoy each other’s company. I know that myself, and many
of us, will miss our dear sister Kassy, but I also know that this community
meant so much to her, and if she could, she would encourage all of us to share
our passions with others as she shared hers with so many of us.


May we all continue our sisterhood in her honor and thank you all for being a
part of this special community!


Fine
Country Living Primitives


http://finecountrylivingprimitives.com/store/Default.asp

Saturday, July 14, 2007

Prim Talk Radio Show #65 Friday July 13th

Today’s Show:

* Angie host of Heartland Graphics will be sharing a segment on how to sell on Ebay for the Holiday Season this is Part 1
* Michelle Lammers from Scrappin with Army Wife talks getting crafts ready for the Holiday Season
* Mary Jo Elliott our newest staff member from Fine Country Living Primitives talks to you about Auctions and Estate Sales
* Aurelia Williams our Personal Development Coach discusses put more balance in your life
* Renae from Prim Clipper is on vacation!
* Vicky will be talking about how to make Tie Dye Crafts with your kids
* Feathured Crafter Interview this week is with Michele from Holly Tree Primitives
* Grab our Advertising Special 6 months of Front Page advertising plus mention on every show for 50% off normal prices the total is only $50 for six months! Click here to order!
* Our Top 5 Partner Program-Get your site listed for FREE
* Aurelia’s Podcast-“Parenting My Teen”
* Jessica Archer-Song “At Last”
* Tim Armstrong Band=Song “Listen to your Heart”
Click here to visit our site
Click here to download our show


Thursday, April 26, 2007

Blogs, Blogs, and More Blogs!

BLOGS, BLOGS, AND MORE BLOGS!

Have any of you noticed how many blogs there are now for individuals, crafters, small business, corporations, etc.?

Everyday when I'm listening to the news I hear someone say, "Just go to so and so's blog at....." And, I love hearing that!

That tells me that blogs have become more and more commonplace as tools for individuals and families to stay in touch, as tools for small businesses and their customers, as tools for the news media, as selling tools, and as tools for mainstream businesses. Everyone and their brother has a blog and I think it's FABULOUS!

What I also love is how many crafting bloggers there are out there. And, most are around my age - which I also think is FABULOUS! WAY TO GO BABY BOOMERS!

If you key the word blog into Google you'll get 1,030,000,000 results. That's a LOT OF BLOGS.

There's a reason why blogs have been increasing in popularity exponentially over the past few years and it's because they are FREE, they are easy to use, they are extremely easy to update, and they are highly personal - which most customers LOVE. If you were to apply the reality TV versus regular TV analogy to blogs and websites you'd understand why reality TV and blogs are so popular. They are both highly personal and both involve people interacting with each other.

Plus, they can and do function for some bloggers as very professional websites. You can have your own domain name and you can use a shopping cart. In fact, I'd say that there isn't much you can't do with a blog. There is a way to do just about anything you want to. That makes blogs much more versatile than a website as they are much more flexible. And, they are a LOT easier to change and update.

The Internet is ever changing and to be in business on the Internet you need to be fluid and ever changing. That means utilizing what's popular with users and customers. BLOGS are extremely popular and easily adaptable to any kind of commerce, especially e-commerce and e-products.

I, personally, love shopping with someone who has a personal or small business blog. I love the feeling of getting to know the person I'm buying from. I don't know if you feel the same way, too, but I always feel more comfortable buying from someone who has taken the time to tell me something about their product(s) and their life or business. By doing so they make me feel feel more comfortable doing business with them. And, that's what writing blogs for small businesses does. Hopefully, if the blog reader is comfortable with the blog owner they will buy their product.

If they do that's FABULOUS! Bring on the blogs. The more the merrier!


Copyright © 2007 - All Rights Reserved - Written By Linda Walsh of Linda Walsh Originals, Linda Walsh Originals E-Patterns, and Linda's Blog. Linda is a doll maker and doll pattern designer. http://lindawalshoriginals.com

Wednesday, March 14, 2007

Easter egg Decorating Fun by Angela Wenke


Easter egg Decorating Fun by Angela Wenke

Easter is such a wonderful time of the year, with all the beautiful flowers in bloom, families coming together to celebrate the holiday that I thought I would share some fun, and creative egg decorating ideas. All of these techniques can be used whether you are working alone or with the help of your children. So sit back enjoy a cup of coffee and enjoy these fun and wonderfully easy Easter egg Techniques.

Masking Tape Eggs


Materials:


*Hard Boiled Eggs (dried and cooled)

*Masking Tape

*Craft Knife

*Food Coloring or Egg Dye

*Push Pins

*Cardboard Pieces

*Paper Towels

*Spoon

*Plastic Gloves (optional)

Steps:

1. Start by boiling your eggs and then allow them to cool and dry completely before starting your project.
2. While your eggs are cooling and drying you can make egg stands for our eggs to dry on, by simply folding pieces of cardboard into a triangle shape and securing with push pins. Make sure to test your egg stands by placing an egg on top, to make sure your egg stand can with stand the weight of the egg.
3. Now place your egg into your first color choice, it is usually best to dye your egg at this point in the lighter of the two shades. As this will be the shade that will show once we remove our masking tape. Now allow to dry.
4. Now we are ready for our second color. Next, simply cut different widths of masking tape approximately 10 inches in length using your craft knife. You can even cut curves into your masking tape or different shapes to add a unique feel to your eggs. Try to keep your tape no wider than ¼ inch to keep a uniformed look on your egg.
5. Now choose which colors you will be using on your egg, it is best to keep it simply with just two colors until you become more experienced.
6. Next, apply your strips to your egg, you can use any design you want. Such as having a center point at the top of your egg that all your strips start from, or be creative and use a plaid design. Your imagination has no bounds in this creative project.
7. Once you have applied all the strips of masking tape to your egg, simply dip into the dye mixture. You may want to dip several times to achieve a uniform color and richness of color. Then simply tap dry with a paper towel and place on top of our egg stands to dry.
8. Once your egg is completely dry, carefully remove your masking tape one strip at a time.
9. Your egg is complete! Now if you would like to add a professional touch and make your egg stand out by adding a gloss to your egg you will want to use polyurethane. Simply dip your finger into the polyurethane with your gloved hand, and spread it around your egg. Be gentle as to not crack your egg, and be sure your egg is completely covered and place back onto the egg stand to dry.
10. At this point you could also add a second coat of polyurethane to insure an even coating and higher gloss. And that is it your egg is complete!

Easy Techniques for Decorating:

There are many fun ways to add some texture or a different design to your normal colored Easter eggs. Inside this article I will share some fun and easy tips.

Bubble Packaging Eggs:

Take a hard boiled egg uncolored and let’s add some paint the fun way! Simply take bubble wrap and paint onto your bubble wrap some acrylic paint in color of your choice, now simply roll your egg over the bubble wrap for a fun and creative texture on your egg. You add stripes of different colors or make a tie die effect. This is super simple and it leaves a wonderfully unique design.

Thumbprint Eggs:

This is a fun one for the kids, allow the kids to apply thumbprints in different colors of acrylic paint. This can create a mosaic look to your eggs this year.

Dripped On Eggs:

Take a colored Easter egg and let’s add some fun to our design. Simply take a paint brush dipped in acrylic paint and drip streams of paint or dots of paint all over your egg. This will give your eggs a unique retro design that will be sure to impress.


Light Bulb Sleeve Eggs:

The Sleeves that protect your light bulbs have wonderful ridges that are so much fun to decorate your eggs with. Simply open your sleeve and lay it flat to expose the bumpy ridges and cover in acrylic paint of your choice, and roll your egg over the ridges. This makes a wonderful fence design if you would like to paint a spring garden.

I hope you have enjoyed these super easy ideas for adding a bit of fun and spice to your ordinary Easter eggs this season.

Author:

Angie Wenke is the owner-designer of Heartland Graphics and Heartland Marketplace.

"I started in the craft community by offering crafts of my own I started selling gift baskets and some handmade unique crafts of my own. That is how I met such wonderful crafters, then I started my first site Heartland Marketplace which has been a huge success! Then I started created graphics which has been my true passion and I started Heartland Graphics!"

http://www.heartlandgraphics.org

To find more great articles like these please visit
Primitive World Magazine

Monday, February 05, 2007

What's In Our February 2007 Issue? Lots and Lots of Goodies!

The February 2007 FREE Primitive Times Magazine E-Issue was just released and you might be wondering what's inside. Well, there's a TON of GOODIES inside!


The FREE February 2007 issue of Primitive Times Magazine (i.e. e-zine) is "Hot Off The Presses!" and ready for for you to download and you're going to love it.

It's jam packed with 29 pages of terrific information for crafters, small business, and website owners.

Just look at what's included:

FREE Patterns

  • FREE Valentine Hugs E-Doodle from Heartland Graphics

  • FREE Kindred Spirits E-Doodle from Olde-Time-Stitchin

  • FREE Fluffy Tail Bunny Pattern from Cats In The Barn

  • FREE Valentine Crow Poke Pattern by Debbie

  • FREE Flower Vase E-Doodle from Olde-Time-Stitchin

  • FREE Spring Thyme E-Doodle from Niki Jackson

  • FREE Sweetheart Pillow by Paula

  • FREE Ewe Are Special E-Doodle by Heartland Graphics


  • FREE Crafting Ideas

  • Make Your Own Mouse Pads by Wanda

  • Valentines Day Gift Certificates Printable

  • Valentine's Day Edible Bouquet

  • Rocks for Your Valentine by Dianne

  • Smelly Jellies


  • FREE Articles

  • When One Door Closes Part 2 by Missy Sue

  • Winter Tyme Blues By Brenda

  • Have You Upgraded to IE7 and Wishing You Hadn't by Nancie

  • How To Design an E-Pattern and a Print Pattern Part 1 by Linda

  • Happy Valentine's Day From Linda

  • Cupid By Dianne

  • Getting Creative With Advertising by Lisa

  • Reflecting With Nancie

  • Goal Setting for 2007 by Angie


  • FREE Graphics and Printables

  • FREE Valentine's Day Gift Certificates Printable

  • 8 FREE Graphics by Heartland Graphics


  • FREE Recipes

  • Valentine Hearts Cookies

  • Kids-adillas

  • BLT-quesadilla

  • Renae's Cherry Chocolate Dump Cake

  • Aunt Margaret's Sugar Cookies With Paula

  • Hearthside Coffee

  • Edible Valentine's Grahams

  • Love Portion

  • Heart Shaped Cookies by Brenda


  • Product Review

  • Seneca Pond Lamp Reviewed by Brenda


  • Featured Crafter

  • Carrie from Prim Market


  • Front Page Picture Donor

  • Debbie's Valentine Crow Poke Pattern from Two Old Crows


  • It's filled to the brim with wonderful how-to's, ideas and articles. You definitely don't want to miss ALL THE GOODIES!

    And, you can DOWNLOAD IT RIGHT HERE!


    Copyright © 2007 - All Rights Reserved - Written By Linda Walsh of Linda Walsh Originals, Linda Walsh Originals E-Patterns, and Linda's Blog. Linda is a doll maker and doll pattern designer. http://lindawalshoriginals.com

    Wednesday, January 24, 2007

    Linda's NEW "Linda How-Do-I-Series?"

    I thought you all might like to know that I'm running a NEW "Linda's How-Do-I Series?" on my "Tips For Crafters On The Web" blog and on my "Testing The Blogs and Helpful Blog Tips" blog.

    Why a new series?

    Well, I get asked a lot of the time "How do I do this?" or "What's the html code for that?" so I thought it would be better if I just posted the articles on my "Tips For Crafters On The Web" blog and on my "Testing The Blogs and Helpful Blog Tips" blog then everyone could then see how to do it. Plus, it will save me a lot of time as I can just reference the articles versus re-inventing the wheel and creating separate emails.

    So, a little sharing and a little self preservation.

    In any event, here's the articles I've posted so far:

    Linda's How-Do-I Series? How Do I Create A Clickable Product Ad?

    Linda's How-Do-I Series? How Do I Draw A Line, Skip A Line, Add A Paragraph, and Underline?

    Linda's How-Do-I Series? Why Would I Want To Create Generic Posts?

    Linda's How-Do-I Series? What's The Difference Between All Those Picture File Types?

    Linda's How-Do-I Series? How Do I Use Margins, Padding, and Borders?

    Linda's How-Do-I Series? How Do I Create A Promotion, Copyright or Bio Signature?

    Linda's How-Do-I Series? How Do I Add Horizontal Advertising Buttons?

    Linda's How-Do-I Series? How Do I Widen My Blog?

    Linda's How-Do-I Series? How Do I Add Wallpaper To My Blog?

    Linda's How-Do-I Series? How Do I Add Vertical Advertising To My Website?

    Linda's How-Do-I Series? How Do I Provide A CLICKABLE Link To Another Section On The page?

    Linda's How-Do-I Series? How Do I Create An Email Link?

    Linda's How-Do-I Series? How Do I Change My Font Type, Size, and Color?

    Linda's How-Do-I Series? How Do I Add A Text Link?

    Linda's How-Do-I Series? How Do I Add A Scrolling Banner?

    Linda's How-Do-I Series? How Do I Center My Banner, Button, Text or Picture?

    Linda's How-Do-I Series? How Do I Make A Clickable Link List?

    Linda's How-Do-I Series? How Do I Set-up A FREE .PDF File?

    Linda's How-Do-I Series? YIKES! My E-Patterns Files Are Huge!

    Linda's How-Do-I Series? Can I Make My Plugboard Bigger?

    Linda's How-Do-I Series? How Do I Take A Screenshot Of My Website?

    Linda's How-Do-I Series? - How To Set-up Forum Signatures or Siggy's?

    Linda's How-Do-I Series? How To Set-Up An Email Signature?

    Linda's How-Do-I Series? How Do I Add a Banner Rotation To My Website?

    I hope all of the above is helpful to you. There will be many, many more "how-do-I" tips to come. Stay tuned.


    Copyright © 2007 - All Rights Reserved - Written By Linda Walsh of Linda Walsh Originals, Linda Walsh Originals E-Patterns, and Linda's Blog. Linda is a doll maker and doll pattern designer. http://lindawalshoriginals.com

    Wednesday, December 27, 2006

    Scherenschnitte Shelf Edging by Debbie

    Scherencshnitte is scissor cutting and was brought to America during the 17th century by Germans who immigrated to Pennsylvania. It is a way of creating intricate paper designs that were originally used for embellishing birth and marriage certificates, valentines and house blessings. The directions here are for what is called poor man's lace because it is made out of newspaper but makes a delightful shelf border.

    Materials:
    Newspaper
    Pencil
    Ruler
    Scissors
    Scallop craft scissors or pinking shears
    Cardboard
    Paper clips
    Tracing paper
    Hole punch
    Paper towel
    Iron

    A variety of folk images can be used for the design……houses, trees, hearts, diamond shapes, snowmen ….the variety is as endless as your imagination. You will need to draw the half pattern design( this just means draw a heart and cut it down the middle) on to a piece of cardboard and cut it out

    Now measure the shelf you wish to lines depth and width add 3 1/2 inches to the depth measurement. Mark this measurements using your pencil and ruler on the classified pages of a newspaper. Keep the columns vertical this will make it so the scalloped edge border of your lining will be on the white margin of the newspaper. Now test your shape or shapes for fit making sure the paper lies flat on the shelf and the paper edge hangs freely over the edge. Trim as necessary.

    Work along the area designated for the overhang. Use the bottom edge of the column as the baseline to keep your design going straight. For each pattern fold the newspaper once along the margin between the columns or along the middle of the column depending on where you want the design to be. Make a crease about 5 inches deep. Place the pattern on the folk and paper clip to secure. Cut along the pattern. For each quarter pattern work only one piece of paper at a time. Fold the paper in half vertically the same as for the half patterns, and then fold the paper again horizontally centering the folk in the overhang area. Position the designs on the newspaper matching the folk. Trace and cut out. Use the hole punch for small circular cutouts. Space the designs 1 or 2 inches apart. Remember this is only newspaper so if you make a mistake its no big deal!

    Layer two or more of the cut-paper shelf edging together and cut the scallop edge with craft scalloping scissor or pinking shears.

    To get rid of the creases made by folding the newspaper, iron it with an dry iron set on hot setting. Place a paper towel over the newspaper and press the creases for a few seconds.

    Remember if you make a mistake this is only newspaper and no great loss but it makes a charming border for an old primitive cabinet or shelf. Other papers such as brown kraft paper, butcher paper and gift wrap can also be used. The motif can be changed with the seasons or to match any décor of a room, the uses are endless.

    Debbie owns "Two Old Crows" (www.2oldcrows.com)
    and an eBay store "Two-Old-Crows"\
    (http://stores.ebay.com/Two-Old-Crows)
    where she sells her hand painted folk art and
    other handcrafted items she makes along with
    antiques,
    primitives and vintage collectibles


    For more great articles please visit our Primitive Times Magazine it is a FREE Downloadable Magazine

    Saturday, December 23, 2006

    THE ANNUAL "MAKING OF THE ORNAMENTS

    I don't know how it is at your house, but around here, on the day after Thanksgiving, the mom's go shopping, and the little ones decend upon Meme's house to make their yearly "surprises" for mom and dad, and help Meme design some great Christmas ornaments.

    Since we have baked our ornaments the weekend before, they are all dry and ready to go. Early in the morning they get out my button box, beads, glitter, paint, sealer, glue, and rolls of ribbons and holiday picks. They drag out 5 large plastic storage bins full of Christmas craft supplies. They're treasure chests for the grandkids, and they spend the first hour going through everything, thinking up ideas, trading great finds with each other, and setting up their work space where no one can see what they are doing. The "priceless masterpieces" are about to be started! We decided to share our favorite ornie receipes, and give you some hints on how to make the "GREATEST" ornies ever!

    Click here to read more

    Gardening in the Winter by Debbie


    Most of us live in places that we are not allowed to garden outside during the winter months, what better way to still enjoy gardening and bringing some life to your home during the winter than to container garden in windows. Houseplants can be a wonderful addition to any décor and give us that lift our spirits need from having some living thing around us, they are much less trouble and easier to take care of than a pet. Here are a few suggestions I have found helpful in raising healthy houseplants.

    Click here to read more

    Making Snowballs... by Paula


    I know that there are bunches of patterns being sold for these. But I thought I'd share my way of making them....these are so fun and really easy. Great for throwing in old trenchers after Christmas when you've taken down the decorations and it's still to early for your Spring goodies.

    Snowball how-to
    Materials:

    12-gauge wire; wire cutters; plastic foam balls in assorted sizes; needle-nose pliers; plaster mix; old spoon; pearlescent white spray paint; white glitter.

    Click here to read more

    Tips and Tricks for Great Stitchings by Niki


    I just love to stitch! I’ve been stitching since I was 10 years old when my Grandma B. showed me how.


    First off, I always tea stain or coffee stain my fabric. I like the look of a stitching on stained fabric, rather than plain white. Most times I use muslin.


    I always back my muslin with batting. I prefer Hobbs, as the Warm N Natural sometimes ‘beards’ and if you are using black thread you can see it come through to the front. I have used Warm N Natural too, though.

    Click here to read the rest of the article

    Saturday, November 18, 2006

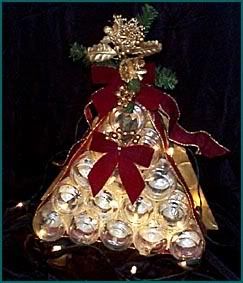
    Baby Food Jar Centerpiece


    Materials You will need:

    15 baby food jars, cleaned, with lids

    White glue
    Christmas ribbon and decoration (optional)
    Small Christmas lights
    Hammer
    Large pliers
    Tin foil, cardboard backing, gold/silver paint (optional)
    1. The first part of this project - gluing the jars together to form the tree shape - took the longest. (I opted to use white glue instead of hot glue or just "rubber-banding" them together.) I allowed each row to dry before adding the next row, laying 5 jars down on their sides and bracing them together with blocks of wood on each end. When the glue was dry, I added the next row of 4 jars, then the next row of 3 and so on.

    2. Using the hammer and screwdriver, pound a hole in the center of each lid. (I used a block of wood, placed the screwdriver in the center, and gave it a good whack, then wiggled the screwdriver back and forth to enlarge the hole.) Protect your fingers and the lights from sharp edges by wrapping the hole with tin foil or electrical tape. I used tin foil and left large pieces hanging out into the center of the lid, because I liked the shiny effect.

    3. Insert lights through the lids and screw the lids onto the jars.

    4. Decorate with ribbon and Christmas doodads as you like. My Christmas colors this year will be burgundy, gold and white, so I used burgundy ribbon and bows, and some gold decorations.

    5. If your centerpiece will sit against a wall, that's all you need to do. However, I want to place my centerpiece in the window sill, and the back will be visible. So, I cut out a piece of cardboard to match the size of my jar-tree and painted it metallic gold. I attached the cardboard using a piece of ribbon, tying a bow at the back. If I get really ambitious, I may make another one of these and stand them back to back in the middle of the table!

    Apple Wreath


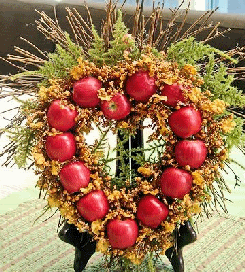
    Miniature Apple Wreath

    Whether you choose miniature apples like ours or full-size replicas, this wreath will look great for weeks. Door Decoration


    Celebrate the arrival of apple season with this beautiful wreath constructed with look-alikes. All you need is a flat twig wreath, artificial apples, greenery, berries, and a hot-glue gun.

    First, glue small sprigs of greenery around the edges of the wreath, following the shape of the wreath. We used dried asparagus fern for our lush base.

    Next, use hot glue to attach the bottom of the first apple to the top center of the heart shape. Leaving the stem pointing out creates a focal point. Then, glue the sides of the rest of the apples to the wreath, following the shape of the heart.


    Courtesy of Better Home and Gardens

    Tuesday, November 07, 2006

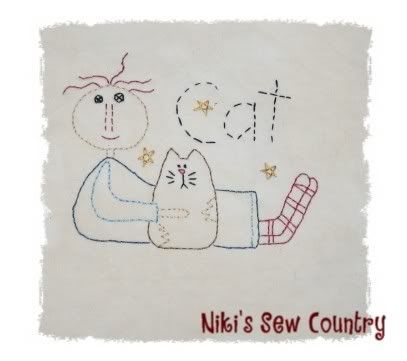
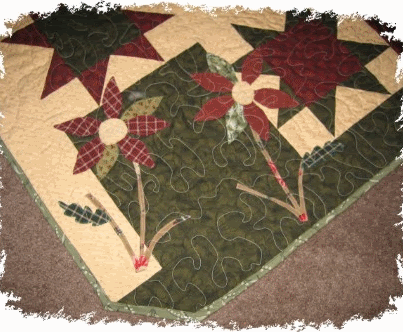
    A LESSON IN APPLIQUE By Niki from Niki's Sew Country


    Traditional quilting we see all around us (stars, 9 patch, etc) is made by using pieced blocks, with rotary cutters and sewing machine, i.e. piecing blocks with smaller pieces by hand. We’ve all seen the cute little shapes and figures added to quilts. These are appliquéd to quilts. This is my favorite part of quilting. The possibilities are endless. You can add a name to a quilt. Maybe a saying. Something special you want to tell the person you’re giving the quilt to.
    Click here here to read more from Niki

    Pumpkin Centerpiece  by Renae


    Don't throw those pumpkins out just yet!! I know if you're like my family, we love to roast the pumpkin seeds after cleaning out the pumpkin, but it doesn't stop there. I cut away as much of the pumpkin as I can and cook it down and use it in my handmade soaps or whatever else I feel like cooking up at the time. What a beautiful centerpiece this will make for your festive table.
    Click here to read more from Renae

    Sweet Potato Garland From Debbie

    weet potato garland is a wonderful accent to primitive or country decor. Stringed sweet potato garland is perfect for hanging on a primitive tree or as garland on a fire place or doorway. I don’t suggest putting it outside unless you don’t mind the varmit and birds eating it.
    Click Here to read more from Debbie

    Thursday, September 28, 2006

    Doll Purfume recipe-From Wandas Country Farmhouse

    Wandas Country Farmhouse has a new article on Primitive Times Magazine titles "Doll Perfume Recipe" here is a small sample

    Doll Purfume recipe

    I use my doll perfume recipe on all my dolls, and I thought I would like to share with other crafters, it's fun and very easy..

    RECIPE FOR DOLL PERFUME

    I use this on all my dolls, they smell sooo good!

    To read the rest please click here to visit us